Monday, March 26, 2012

RENEW and REFRESH an old Baby Box

Have you still got your child's old
baby box. Are you hesitant about throwing
it away. Well dont do that. Refresh that old box
and use it for something else.
This is actually a very nice box that I picked up
at the thrift store. Yes it was a little dirty
but all n all - it was not bad. The box was
sturdy with no tears on it. I love boxes!
 You can see the dirtiness of the tabs that open the
box as well as some of the dirt on the inside.
Something red was in one of sides. You can still
see it.
 The bow was dirty but that is easy to replace.
Read those sweet words that surround the photo
of Pooh bear. We have to hide those words.
 Pretty butterflies are all over the box including
the bottom.
 Well here goes - this is what I did. I cleaned up
all of the inside slots in both drawers. Here you
see me cleaning up the red spot. I do not know
what was in this drawer but it cleaned up okay.
 Time to change that ribbon. I used the same kind of
white ribbon that was on the box. So glad that I had
some of it already left over from prior projects.
The old ribbon pulled out and with a safety pin I
pulled the new ribbon thru and tied it in a bow.
 I used a flowered scrapbooking paper that had
many of the colors of the butterflies that were on
the outside of the box. Flowers and Butterflies
coordinate.
 After I finished the bow then I cut out a
pattern for the scrapbook paper. All I did was take
a piece of computer paper and lay it on top. Then
with my fingernail I pushed the paper all around the
edges creating a pattern. I removed the paper and
cut out paper pattern. Then I traced around it on
the scrapbooking paper. The flower design is not
even glued in - I just placed it in the indented area.
This spot is also great to put a loved ones photo.
This would personalize the box and look great!
But I did not have that kind of a use for this box.
 The inside looks good with scrapbook paper. I
did not glue it down either in case later I want to
change it. The flowers look great with the blue green
checks.
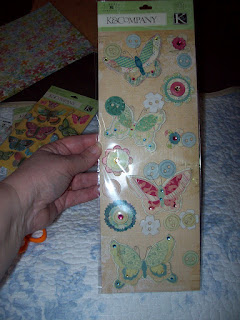
 The scrapbook paper I already had, but I had to
buy the butterflies at the craft store. I looked
for flowers but I could not find anything that I
liked. These are butterfly stickers. They are
made from cardboard.
 I positioned the 2 large butterflies to hide the
words Baby. Then I used 2 smaller flowers to
also hide the words baby. The cardboard stickers
also had button pieces. So I placed 2 of those
button stickers on top. They adhered very well.
 This is what onse side of the box looks like.
 This is the other side of the box.
 I removed those old pull tabs that opened the drawers.
See how grimy they are. They got thrown away.
 This is how I replaced them. I used white ribbon
and threaded it thru one of the cardboard stickers.
The older tabs when removed left holes. So I threaded
the ribbon thru those holes to the inside of the
drawer.
 Here you can see where I knotted it really good.
Afterwards I trimmed up the ribbon.
 Now the box looks really good. Time to see what
I want to stuff in it.
I hope you enjoyed looking at my new box.
Next week I will show you what I used it for.
Thanks for visiting me!
Many hugs and kisses to you all.
Hopblogger
Sunday, March 18, 2012

A show of 2 of my Biscornu patterns

Hello Everyone.
First, I would like
to give all of my new followers
a very warm welcome. I hope
that you enjoy my blog.
I have a beautiful Biscornu to
show you. Dede stitched up 2 of
my patterns and sent me pics to show
you. The patterns are so much prettier in Linen
than in Aida cloth.
The Biscornu's are stitched on 28ct Cashel
"Pampas" which she bought at the Picture
This Plus store in Kansas. 
Thank you so much Dede for showing everyone
your beautiful biscornu.
Your friend is a very lucky woman!

I really would love to see any pics that you have
stitched using my patterns. Some more Biscornu
patterns are on the way!
Many hugs and kisses sent to you all,
Hopblogger

Thursday, March 15, 2012

Scissor Case & Fob

Hearts with a Rhodes Heart
Another pattern that has not yet
been stitched. Please let me know
if you find any errors.
 
Stitch the front in linen or Aida cloth.
The choice is yours.
However, be sure to cut 2 pieces of whatever
you use - one for the back and one for the
front. Cut the cloth a little
bigger but do not add the flap on one of the
pattern pieces because the front piece
does not require a flap. The flap should be
added to the back piece as this piece will fold
over onto the front. Be sure to line the inside
with fabric so the scissors do not catch your
threads and break them and ruin all of your
hard work. Also line the scissor case because
your linen or aida cloth might be flimsy and
need that extra support.

Do all of your stitching on the bigger pieces of
fabric. You can even do this stitching on the
back piece of fabric that contains the flap. It is
easier to cut down any excess than to add fabric.

Once you are finished stitching there are several
ways to finish this scissor holder.
1. One way is to line the front piece up with
your lining fabric, stitch on the back sides,
leave an tiny opening and turn right side out.
Press or finger press the seams. Then close
the seam. Repeat for the backing. When finished
put insides together and sew on the sewing
machine for sturdiness. Turn right side out
and press. Turn down the flap and use a
button closure or velcro.

2. Another way is to cut out front and back
pieces, add a lining and then use a blanket
stitch to close it together. Turn down the
flap and close anyway you like.

However I was going to just cut red FELT for
the backing and blanket stitch all around to
include the flap.
 
But use and do what you prefer. Just use the
patterns here as a guide. Google scissors
tutorials and see which one you prefer to
use.

Some tips: Always measure your scissors
and allow extra fabric for the scissors. It
would be a shame to accidentally cut the fabric too
small only to find out your scissors will not fit inside.
Then you would have to work the pattern again
onto bigger cloth. Even though it is a
quick and easy pattern to finish it can be
redundunt to do it again. So always measure
before you cut any fabric to make sure
everything lines up.
 
Once the flap closes it will hide your first
Rhodes pattern. But if you like you can make
the pattern longer and put the Rhodes patterns
further down. But this would not be a problem
if you put the Rhodes patterns also on the back
side.

If this would not bother you then it would be
a surprise to open the flap and to
see another heart!
 
Decorate the front and back with anything that
you like - use beads, sequins, hearts and
glitter to add extra punch or not. The choice is
yours.
 
This set can also be used for HALLOWEEN.
All you have to do is change the colors
to black, purple and orange.

The scissor fobs are easy. One side is hearts and the
other side is the Rhodes pattern. Or you can
stitch up the front with the Rhodes pattern and the
back with the Hearts pattern and put them together
to match your scissors case. The choice is yours.
Thank you for visiting me!
Many stitching hugs and kisses sent your way
Hopblogger

Monday, March 12, 2012

How do you store your movies

About 8 years ago I had a storage problem
with how to store my movies - not music cd's.
No one has room enough
in their home to store a large collection - at least
I do not. My home is very small. I had to find a way
to keep my movies and still be able to store them.
This is what I came up with.
I have stored my movies - not music cd's-
I mean movies. I do not buy any music cd's.
Believe me you will love these binders.
Each one of these binders
holds 250 cd's. You can purchase them at Staples
for a mere $15.00. Staples still carries them.
They are made of canvas.
I have tied little gold ribbons on my zipper so
the zipper is easier to find. This helps for when your
binder gets full. My sister has a huge collection of
movies because movies are her pasttime. Recently
she was telling me about the clutter with these movies.
So I told her how I store mine. She surprised me when
she told me that she liked this idea. She has organized
her movies by comedy, mystery etc.. Where she used to
have a large bookcase full of movies - she now has
4 binders for scary movies. She has 1 binder for
comedy etc... Now she has room on the bookcase
to put plenty of other stuff. Good job Sue!
 I only have about 8 more pages before this binder is
complete. It will still take me another year to finish this binder.
 The box that you see holds all of my movie titles.
I am not yet ready to recycle them into the dumpster.
I dont know why. It must be a mental thing??
 This is what they look like in the bookcase.
Neat!
Many hugs & kisses sent your way!
Hoblogger


Saturday, March 3, 2012

My new Floss Holders

Look at these lovely floss holders
that my friend Catherine (diamondC) sent to me.
Aren't they gorgeous!
She made the pastel blue heart from clay.The pretty
wood one she had 2 of them and generously shared one
with me.
Thank you Catherine - I love them both.
I cannot tell you which one is my favorite. They are
both so gorgeous!
Many hugs & kisses to you all,
Hopblogger