Hello everyone!
Hope ya'll are not sick like me.
I wanted a Halloween witch doll cover for
my sewing machine. I searched the web
but could not find a pattern so I decided
to make one for myself using an
existing doll.
I think that she just might be a one-of-a-kind
doll sewing machine cover!!!
Many years ago
while in Oklahoma, I made a Bunny sewing
machine cover from a pattern. About 4 years
ago I gave the pretty Bunny cover to my older sister. I thought
she needed a dust cover. She proudly displays
it on top of her sewing machine.
I hope you like how I did remake my doll over
for Halloween. I will even tell you
how I made her. The directions are not
hard, just many. If you do not understand
just drop me a line and I will try to tell
you better.
SO - DO NOT BE SCARED!!!!
......HALLOWEEN APPROACHES....
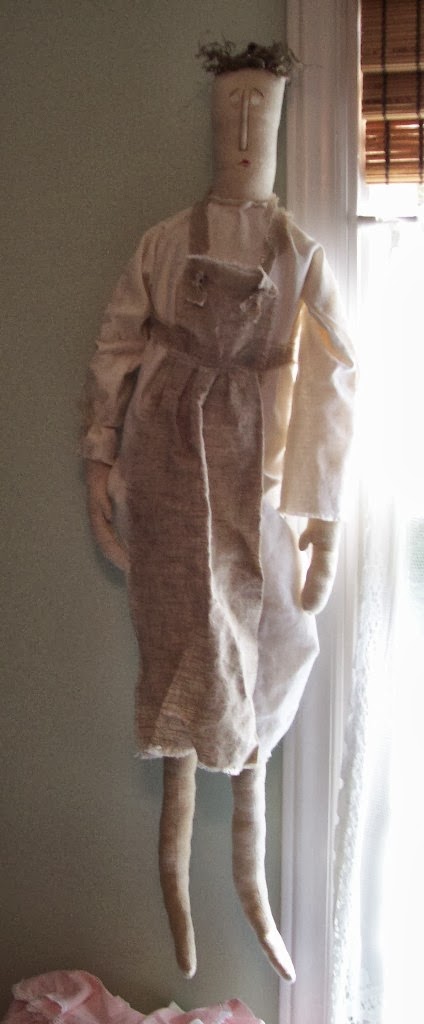
MEET SCARY SABRINA, the good girl, angel.
I do not know what she was. I bought her
last year at a thrift store. She was 34 inches
long and had a sparkling fairy wand. She
did not look like a fairy to me. No offense
to the lady that made her. A nice job was
done here. She is stuffed really well and
is made from Osnaburg. That is a nicely
woven fabric.
Scary Sabrina stayed
up here on my curtain holder the entire
time.
Here she is sitting in my
chair. You can really see here
how long she is.
I took her legs off. I will save
them for another project soon.
I want the skirt to hit there
where my forefinger has made a
dent in her body. Do you see that. I then cut about
3 inches down to about where
my thumb is. No measure, next cut the fabric
I then stuffed more stuffing inside her
cavity. Then I sewed it shut
exactly as you see the way the
lady that made her did.
I forgot to take pics of what
I did next so you must bear with
me so you can understand.
I used cotton batting but you can
use whatever you want to. I cut 2
pieces of batting 15 inches long
by the width of the doll. I
sewed it together lengthwise
and left each end open. Seams can show,
cause it does not matter. The width
of the top of my sewing machine
is 6 inches wide. So I folded the
stitched batting in half to get the center
and laid it on top of my sewing machine.
In other words, you want about 10 inches
of the batting to hang down on each side of the
sewing machine from the top. Now,
stitch across the batting on one
side and then in my case the top
width is 6 inches, I then stitched
again 6 inches away from the
previous stitch. This way my doll will
sit on top of my sewing machine
correctly. After this, my hubby gave me
18 large- size flat thick metal washers.
On one opened end, I inserted 9 of these washers
in the batting and stitched the batting closed. Repeat
to the other side. This keeps the
doll steady on your machine.
Next, center your doll between the
2 stitching's that you made and sew her down good
in the middle between those 2 stitching's.
Now you are ready to give her
clothes!
This was the nice linen-feel dress that she wore.
I decided to use it.
FOR THE BODICE.
I cut off quite a bit for her
bodice. I cut it extra long because you can always
cut excess off. If you cut off too much then just
stitch on more. But I was using what I had and I
did not want to sew anymore than I had too. After I
cut off the size I wanted, I then went to my bathroom
and painted it black. Yep, yes I did!!!!
I used regular black craft paint and layered the paint
on heavily in some areas. Both sides, but not on the inside. That
took me quite awhile. But it was well worth it!!
I took this pretty dress from the thrift store. Washed
and dried it very well. I only wanted the black cotton
Tulle skirt underneath.
To make the tulle skirt.
As you can see, I cut the skirt off from underneath
the skirt as far up as I could go. In other words
you want as much of the slip as possible. So cut
higher than waist if possible. Sorry here is where I forgot
to take more photo's again. Anyway, to put this on my doll,
all I did was take thread and a large needle and make
large stitches around the skirt at the top to gather it.
I placed the skirt on the doll and positioned it at
the waistline, then I pulled the threads tight to
gather it to my doll. I did not give a hem at the
top since you will not see it. I was not concerned
with that. After that is hanging like you want, take
it to your sewing machine. Place the doll on top
and make sure the skirt hangs where you want
it to. It should if it is long enough cover your
entire machine.
For the over-skirt, I had a size
large (that went to the knee) black gathered skirt. I cut off
the waistband. I then gathered it at the top the
same way I did the black tulle skirt. I placed
the black skirt a couple of inches above the
the tulle skirt (close up under the armpits). This
way I could cinch it really tight so it would
hold and not fall and also to give more strength
to the doll. Again I took this to the
sewing machine to see if it hung properly.
It did. This part went very quickly.
For the Bodice.
I then took the white bodice that I painted
black and placed it on the doll. I gathered the
arms with white crochet thread and put in a
bow. You cannot see it but the bodice is on
top of the skirt.
After this, I placed the
apron back on the doll. Then I decided
how I wanted her to look with the hat.
Here is a close-up of SABRINA. See the osnaburg
fabric. I did not mess with any of her facial features.
For the hair I used a whole ball of crochet thread
that had some tan or light brown running thru it.
All I did was just form long loops around my finger
to get the length I wanted. Once the entire ball was
around my fingers, then I cut the top and glued it
on top of her head, making sure that the back of her
head had some as well so it would hang down like
I wanted. If I had black crochet thread I would
have mingled it with the white but I did not
have it. Note to myself, next time get black
if I do this doll again.
For the hat, I did not measure. I cut out
2 large triangles, one for a back and one for a front.
And then I cut out 2 large round brims with my
pinking shears. I cut a hole in the middle of both brims, a
little smaller than the width of my triangle's base.
I then stitched the sides of the triangles together with some wire
in both seams, then turned them so the wire is on the
inside, and then I sewed the triangle to the base
of the brim. (Or you can glue it. It is up to you).
After this, I went to the bathroom and painted it
black also. I painted the underside black and also
painted some on the inside where the head goes,
just in case you would see some of the inside hat on the
outside. When this dried, I stuffed it like I wanted.
Then I twisted the hat like I wanted it to look. It
stayed put. Next, I placed the hat on her head seeing which
way looked best and then I glued it on her head with
regular craft glue. Then I decided her hat needed
a little something extra, so I glued orange grosgrain ribbon
to her hat and glued a pumpkin button to hide the front
seam of the ribbon. I then added
an ear-ring to the end of her hat. The earring
is glued into the fabric. It was easy to pierce the
black fabric for the earring. Just be sure to use glue
on the earring wire (and not a lot of glue) and stick
it in.
(Witch hats are easy to make, you can
google a witch hat pattern online. After a couple of times
of making them, you start to understand it better).
As you can see I left her button eyes and her little
mouth. Her long nose gives her a prairie doll feel.
Since Sabrina is a sewing witch.
For the Chatelaine and Orange Pumpkin.
I gave her a
chatelaine the same ribbon as what is on her hat.
I cut 2 pieces of orange felt in a circle and sewed
them together at one end of the chatelaine. I then
hid it with a ribbon and a pumpkin button. I stitched
part of the left side of the pumpkin together so it
would not flap like the wind. I cut 2 eyes and only
a mouth and sewed with only a couple of stitches
to keep them on. To the other end I curled up the
end thru the scissors and stitched the ribbon shut.
The bow and pumpkin button hide this also. On her
scissors I attached a watchband. The watchband
is a deep purple, a light purple and clear
beads along with small beads. It was so cute
that I could not resist placing it on her scissors.
After that was done, I slipped an orange pumpkin
on her hands and then I gave her a few stitches
on her hands so they would be closed.
The orange pumpkin was an item I bought after
Halloween last year to use as a pincushion. I
never used it. It was so cheap!!!
Anyway I took some of my
pins and painted the tops of them black
and stuffed it into her witch pumpkin pincushion. By the
way his hat also got a pumpkin button. I think that
I should paint some orange pins and stick in there also.
Anyway, here is Sabrina. I hope that you understood
my directions. I love how the tulle hangs below
her skirt.
This doll did not cost me much. The doll was
$2.00 at the thrift store. She was there for days
before I bought her. I guess no one did not want or like
her. The orange pumpkin was from A.C.Moore's craft store after
Halloween sale and cost 50 cents. The tulle
skirt was a dollar at the thrift store. So it only cost
me $3.50 cents to make her. Her hat was made
from scraps and the skirt was mine from years ago.
Scary Sabrina sits nicely on my machine. The skirt helped
add bulk to her middle. Bulk is good. Bulk is what you
want and need here.
The bodice and the hat being painted black has a
canvas feel. It is crisp. Some of it shines. I guess
that is because I really layered the black paint on
it a little heavy. Anyway it glistens so I like that.
You will be able to see it on the side of the hat
that holds the earring. I did not get frilly with the
hat. You could if you wished to get fancy.
Another photo of her hat. Be sure not to stuff
a lot of stuffing in her hat or you will not be able
to twist the hat like you want to.
A better pic of her earring. A pumpkin with a
black cat. When I bunched up the hat, it made
the hat look gathered at the seam. I liked that.
A better photo of the chatelaine. Nope,
I did not put in a pumpkin nose. I kind
of think that perhaps I made the pumpkin
needle holder a little too big. You be sure
to make it smaller. I will change mine so
you can see the apron better.
Inside the chatelaine. When I am finished
I always attach the needle that I used and
a piece of thread. I sewed the hat together
with white thread. It did not matter since
it was being painted. Plus I am so lazy when
it comes to changing the thread on my
sewing machine.
Better pic of the smiling pumpkin and the
crochet thread used for bows on her arms.
The bottom of her skirt again. I just love how that hangs.
Scary Sabrina's back.
Don't you just love her hat!!
Thank you all for visiting me. I hope you
Enjoy SABRINA!! She sets proudly on
my sewing machine.
Hopblogger