
MAKE A HALF DOLL PINCUSHION
FROM A BRADLEY MUSIC
DOLL DANCER!!
Hello everyone! I trust you have been
FROM A BRADLEY MUSIC
DOLL DANCER!!
Hello everyone! I trust you have been
well.
I have made another EASY TUTORIAL
for a half doll pincushion!
for a half doll pincushion!
This time she is made from a Bradley
wind up Music Box Dancer Doll.
You have seen these around I am sure or perhaps
you have one that you do not know what to do with.
Well, I hope to inspire you to take out that doll and
make her over into a lovely half doll pincushion.
Perhaps you already have some vintage half doll
pincushions around, if so why not add this
one to your collection.
Mix old with new!!
This Bradley Half doll Music Box Dancer was only
$3.00 at the thrift store. Her gown was in perfect
mint condition. The only thing wrong
with her was that the music box did not
play correctly, so she would not dance.
And I do not know how to fix them!
I am not sure if the doll would even be
worth fixing??
My music doll dancer did not have any
smell on her. Make sure your dancer
does not have any smell either.
I would never tear up a working Music Box Dancer
half doll, but if you find one with a beautiful
gown and it does not work.
Hey I say 'GO FOR IT'!
I have a place above my sewing machine at my desk
that the half doll pincushions I make will be displayed.
Believe me, I have 2 more that I am making and I will
give you directions on how to make each one of them.
These half dolls are just gorgeous. That is, if you
love vintage items then these half doll pincushions
should speak to you. Well, Lord knows they have
been speaking to me!!!
Lols
Each doll I make will be different, so I hope to be able to show
you how to make your own pattern.
Today I will be showing you how to make the Peach
half doll pincushion that is in the middle.
She stands a little over 6 inches tall and around the
lower part of her base she is 15 & 1/2 inches in
circumference. You make think this is big, but it
is not. Her pincushion goes slimmer the closer you
go to her waistline. And if you compare the doll
on the right to her, you see she is small in comparison
to her.
I will show you how to do the half doll pincushion
(in white) located to the left of the
Peach half doll, but that tutorial will
come later, and will not be on this posting.

HERE IS MY HALF DOLL PINCUSHION
FINISHED!
Her gown and her hat will stay on the
doll. Truly, the only thing she will
be getting is a pincushion!
Now, if you find one of these Music Box
Dancer Dolls with a gown in bad condition,
then remake it by taking the gown apart
and using it as a pattern. You could truly
make the half doll pincushion to your liking,
especially if you did not like the color of
her gown. I am sure if you do not like the
hat, that it would come off easily. You might have
to pick off the glue and hopefully it would
all come off, but if not, just make another
hat, identical or not and glue it on her head.
MEET CHARLOTTE. This was the name
given to her by her creator by the Bradley
Music Box Dancer Doll.
I have opted to keep that as her name
since she came with it.

Here she is close up. I have her holding onto a silk
rose. As you can see, the half doll is lovely!
So why don't you remake a Music Box Dancer
into a half doll pincushion!!!
These dolls deserve to be reused. However I do
not know if they are vintage. I did not look up
the year of their birth. They are not porcelain.
They seem to be a hard, hard plastic. But honestly
you can hardly tell unless you flick it with your
finger. The details on these dolls are outstanding!
Look at her hair. Her eyes are lovely.

A side view of my half doll pincushion.

Another side view of my half doll pincushion.

Her back side.

Her hat.

BRADLEY MUSIC DOLL DANCER!!
Read all directions and understand them
before you begin on the doll or make the
pincushion.
This is what the doll originally looked like.

She did not have any frills.

Her back side was plain. You really cannot
see the wind up key hidden under her lace
overskirt. But it is there.

On this side view you can see peeking
out from underneath of her skirt,
is her white base.

You can see some of her white
base under the tag also.

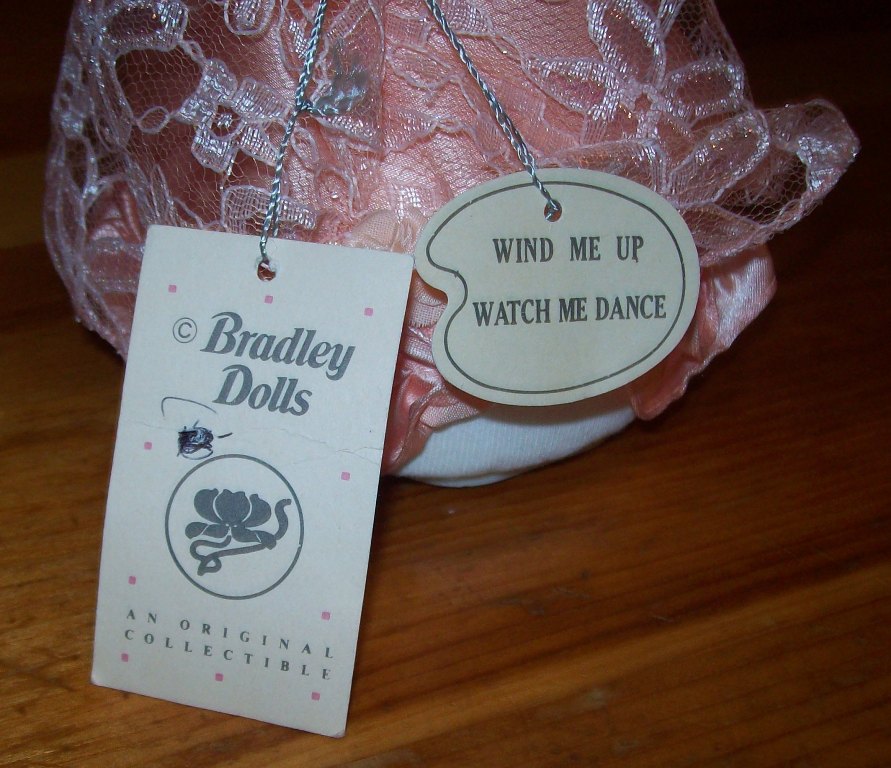
This was still on the doll when I got her. No one
took her tags off. She must have been stored for
a long time.
I have lifted her lace overskirt to show you the key.
I love the bottom ruffle that is seen on many
of the pincushions.

A peek near the bottom.

This is the bottom. The tag still showed her name!
Amazing that the tags glued on
were still there. Peeling up, but still there!

The width of this base is about 4 inches as you can see
with the ruler. My half doll pincushion is not that
wide across the base.

NOW, LETS TAKE HER APART!!!
Lift up the lace overskirt in the back of the doll,
and find the wind up key.
It is easy to remove. Just unscrew it.

Some of the cloth skirt could have some glue on it
to hold the skirt down. I found this to be easy with
this doll. I guess because it is old. Anyway try to
locate where the glue is, and gently lift away the skirt
while holding or pressing back the white fabric base.
It is possible that the skirt just peels away, like mine
did. I do not have any old glue residue on the inside of
my skirt. If you do get some old glue on your
skirt, try to pick it off.
See, that old nasty glue residue.

I am lifting the skirt up so you can see her oblong
base and close to the top.

As you can see, her base is about 4 inches long. That
is a good size.

She measured about 13 inches around.

We will need to start at the bottom. These are easy
to remove. Remove any stickers. They peel off easy.
I found that this long white plastic thing is just glued
to the base. I pulled off the 2 round discs that
you see here. For me they popped off.
I just used my fingers and peeled up the
rectangular white plastic thing.
For me, it all came up really easy. No hard work
at all.
Underneath the rectangular plastic thing is the
bottom for this music box. I do not have a photo
here, but you should see 2 holes where those round
discs were. Just put your scissors in there and snip
away some of the bottom fabric. Snip in a circle
cause what you want to do is cut away the bottom
of the fabric because you cannot use it. Mine was
still glued to the foam board base.
Make sure that you do not cut any of the fabrics
on the sides as that is your pattern. Try to
keep that in tact.
Lift the white fabric and tear out all of the music box
pieces and the foam.
I call this white fabric once everything on the
inside has been removed - A WHITE SAC.

After everything is torn away and or removed,
this is what you will see. I will call it a 'NUB'.
It is made of wood quite possibly from a dowel.
But I still call it a nub because not much of it
sticks out as you can see beneath the white sac.

Clean off some of the glue residue. It should
pick off easy as it is old glue. Use some
tweezers to help grip it if needed. Truly,
the glue does not take long to clean away.
Do not get picky with it, some will remain.
What you cannot get off, do not worry about
it. Some will not come off.
Let go of the white sac and let it fall and
hide the nub.

Find a starting place and gently lift away
a piece of the white sac from the NUB.
This is where I started peeling away
the sack from the NUB.
I am not worried about this little bit of glue,
because it will be hid inside the pincushion.
Work your way around the NUB until you
remove the white sac. Try not to tear the white
sac.

See, white sac all gone! Here you can see how
the skirt is attached with string. As you can see,
the peach skirt is glued to the nub. String for
security.

Now, this is what you should have. The white sac
should look similar to mine. It is made of
white T-shirt material or a thin jersey. It
is still stretchy. See the bottom of the
seam, cut those threads and open
this up.

This becomes your pattern for the pincushion.
UP TO THIS POINT, IT HAS BEEN SUPER EASY!!!
ALSO, IT HAS BEEN SUPER FAST!!!!
Wouldn't you agree?

I AM MELTING!!!! Charlotte sits on her nub
while waiting to be put back together.

MAKING THE PINCUSHION SAC.
((Here is another way to make the pincushion
besides the way that I show.
Cut a 3 or 4 inch round cardboard base. Cut your
fabric bottom piece a half inch bigger than the cardboard.
Then cut a rectangle piece of fabric, the height is your
choice although I would make it taller than the nub.
Allow for a seam. Sew the bottom fabric onto the
rectangle fabric. Turn fabric to the right side.
Stuffing required. If you use this way, it is easy,
but you will have to mingle these directions in
with my other directions, as I used the fabric
as a pattern)).
Okay, there will be a smaller seam. Open it up and
this is what the pattern will look like.
This is the pattern and the way that I will
be using. I have to tell you that I had some trouble
making it this way.
I opted to use a pretty off white Cami. It was
Satin with some nylon to give it some stretch.
I wanted the pincushion to be shiny underneath
the shiny peach skirt. What you use is up to you,
but for this pincushion - USE FABRIC WITH
A LITTLE BIT OF STRETCH OR GIVE TO IT.

I took the pattern and folded one side on to the other
to make it what you see here. On the fold, I cut this out.
The fold of the fabric is on the right side. Do you
see the fold?
I followed the outline of the pattern and just cut
the excess fabric away with the scissors. I did not
pin anything. As you can tell the pattern was about
5.5 X 5.5 inches. I cut it bigger and I am so
glad that I did!!!

Remove your pattern and sew up the 2 seams. Back
stitch so the seam does not come undone. This is
what it should look like.

Cut the bottom piece a half inch bigger all the way
around the cardboard. My piece of cardboard
is 3 inches around.

As you can see I had a little trouble. One side
was a little pointed. Since I am going to use
this pincushion, I did not let it bother me.
You can make it perfect if you like.

As you can it is a sac with a little opening.

For the cardboard, I cut 2 pieces of cardboard
3 inches around as stated above.

I glued both pieces together and let it dry. Then
trimmed the edges even. Draw a round circle on the cardboard
just to show the middle.

Something happened to me here, cause I never saw
that piece on the right. I must have been sleepy.
Instead of drawing a circle I recommend making
an X - as you can judge the center better.

Now, I probably would not have had any trouble
making the pincushion. But I wanted more
stability for this doll. This step lengthens the doll.
My husband had a piece of
plastic pipe that he cut a little more than
3 inches long for me.
Make sure the NUB fits inside, if you do this part.

We used LOCTITE glue and buttered it up on the
inside. You see the glue.

With the nub secured inside, I let it set 24 hours
to make sure it held fast. That pipe is secure to
the nub.

After the pipe has dried.

I then glued the pipe down onto the cardboard.

This is the pincushion sac. Notice that I
had to cut off some of the top!! This was to
allow the cardboard to get inside.

My fabric was a little stretchy and that helped
allow me to put it in. This is how I got it in
the sac. If your fabric is not stretchy and you
are fixing the pincushion this way, then you
will not be able to get the base inside of the
pincushion. Hence the reason for you to use
stretchy fabric.

Here is the sac with a wide opening at the top.
((If you make
the other pincushion, this is what you want. A large
opening to put the cardboard inside Even if you do
not lengthen the doll with plastic pipe, you still
want a wide mouth opening. You want to be
able to stuff the pincushion with ease)).

I just pushed down the sac so you see the
pipe and some of the nub.

STUFFING THE PINCUSHION
AND ATTACHING IT TO THE NUB.
If you read about my other pincushion, you
will see that I stuff my pincushions with cotton
Quilt batting from Wal-Mart. I do not use batting
in a bag, I buy the quilt batting off of the roll.
It is so soft!!! I quilt so I always have this
around. You might want to buy a half yard or
less. However I use a lot of it in filling
these half doll pincushions.
Maybe you want to use fiberfill. The
choice is yours, but once you use this soft
quilt batting, then it becomes hard to go
back to fiberfill. The batting tears away easily.
Just tear away small pieces. It takes a lot to
stuff these pincushions because you want
them stuffed tightly.
Stuff all around the plastic pipe all the way
to the top.
STUFF TIGHTLY TILL YOU
CANNOT STUFF ANYMORE!!!!
I put glue on the NUB, and glued the sac
top unto it.

My hubby took some good twine string in green,
and wrapped it tightly just to make sure to give
the pincushion more security. We put glue on
the string all the way around for extra security.
It will be a long time before this will be pried
off of the nub!!

COVERING THE METAL KEY HOLE.
Now you can put the dress back down. Do you see
a long straight pen that is sticking out of the
round area where the wind up key went!
We are going to fix that where you cannot see it.
Can you also see at the bottom of the lace skirt
a little gathering below the straight pin.
Well, that gathering was
already there. Sorry I forgot to snap a photo of
it.

What I did was to start with that gathering piece and
gather up the lace till the gathering begins to hide
the round metal hole as you see here.

Once the gathering is finished, give it a little knot,
so as not to loosen the gathering.

Bring your needle down into the lace and a little bit
into the peach fabric and bring the needle out of
the metal hole as you see here.

It does not take much to anchor down. What you
are doing is, anchoring the thread to the metal
hole as you see, then take the needle thru the
lace overskirt. Pull tightly to draw the fabric to
the metal hole. Once the metal hole has the lace
covering it, then knot off the thread. Cut away
excess thread with the needle.

It should look like this. Once you fluff the lace,
you should not be able to see the metal area.

Once you gather like this, you need decorations.
You can use a pretty bow from the store. Make
your own or use what you have. The choice
is yours. I opted to use a stretch gold elastic
piece because that was all that I had. I did
not have any gold ribbon to make any gold
bows. So I used this gold elastic that you
put on Christmas packages.
Looks good to me. Maybe later I will change
it, but right now, it is okay with me.

I also put a piece around her waist. I
merely knotted it on and let the tails just
hang.

Charlotte's base with some pins.

FOR THE WHITE ROSE BUD
IN HER HAND.
You can put anything in her hand that you
desire. A pocketbook with a chain can hang from her arm.
Or a purse can be wedged in her hand. You can
put a necklace around her neck. She can hold a
shawl or a piece of embroidery. Maybe you
want a pretty quilt to hang from her arm.
The choice is yours.
I knew I wanted to put something in Charlottes
hands. I had a package of little white roses as you
see here with long stems. I bought them from the
thrift store also for 25 cents. I only realized
when I removed a flower that they were silk. They
feel so soft!!!
Anyway I only used one as you see from the pixs.

With my fingernail, I gently opened up the petals.

My fingers and my fingernails are little. So
where you see my fingernail showing you,
go smaller and bend up the green wire as you
see in the photo.

Make a little loop at the bottom. Then
at the top keep wrap it around
till it looks like this.

I wrapped the entire long wire around
like this. I smashed down the edge
so as not to poke or cut me.

It is not glued to her hand. It is wedged in
between her thumb and fingers. If it does
fall, then I will glue it to her hand.

I hope you check out these dolls and make
one soon! If you make one, if you send me
a front and back photo along with your name,
then I will post it here for you.
Thank you for visiting me!!
Hopblogger