Monday, May 30, 2011

What is this!

What is this - you ask! This is a toothbrush holder.
Ooh - La - La makes it. They made companions for
this holder but I never bought them. I am sorry now
that I didnt. I am always on the look-out for the
makings of a new SCISSOR HOLDER!
 The top of the holder is a hat! I like the colors of
black, pink, white and a little bit of green. Looks
a little bit romantic. Most of all its girly and I like that!
 On this photo I was trying to get you a better look
at the design on the bottom. That didnt work.
 It came from K-mart. I wonder if they have any more
of Ooh - la - la.
 See it works great! It doesnt even tip over. This is
so cute - this is a keeper!
Start looking at those toothbrush holders.
You might have something as cute as this one
lurking under your bathroom cabinet thats
just sitting there!
by conny

Free Cell Game # 2

Here is game # 2

1. Double click on Ace spades
2. Double click 3 hearts upstairs
3. Double click 7 diamonds upstairs
4. 3 hearts on top of 2 hearts
5. 7 spades on top of 8 hearts
6. 8 diamonds upstairs
7. 10 spades on top of Jack hearts
8. 4 hearts on top of 5 spades
9. 4 spades on top of 5 hearts
10. 6 diamonds on top of 7 spades
11. 2 clubs upstairs
12. 5 spades stack on 6 diamonds
13. 9 spades on 10 diamonds
14. 8 diamonds on 9 spades
15. 9 diamonds on 10 spades
16. 7 spades stack on 8 diamonds
17. King hearts in free space
18. Jack clubs upstairs
19. Queen clubs and Jack diamonds on King hearts
20. Jack clubs in free space
21. 10 hearts on Jack clubs
22. 10 spadfes and 9 diamonds on Jack diamonds
23. 9 hearts upstairs
24. 5 diamonds upstairs
25. Jack hearts upstairs
26. 3 diamonds on 2 diamonds
27. 7 clubs on 8 hearts
28. 6 clubs on 7 hearts
29. 5 diamonds on 6 clubs
30. 6 hearts on 7 clubs
31. 4 hearts on 3 hearts
32. 4 spades on 5 diamonds
33. 5 hearts on 4 hearts
34. 6 hearts on 5 hearts
35. 9 hearts in free space
36. 5 spades on 4 spades
37. 6 spades on 5 spades
38. 8 spades on 9 diamonds
39. Queen spades on King diamonds
40. Jack hearts on Queen spades
41. 7 hearts stack on 8 spades
42. 9 hearts on 10 clubs
43. 9 hearts stack on Jack hearts
44. King spades in free space
45. 7 diamonds on 8 clubs
46. 8 club stack on 9 hearts
47. 9 spades stack on 10 hearts
48. 10 diamonds on Jack spades
49. Queen diamonds on King spades
50. Jack spades stack on Queen diamonds
51. 8 heart and 7 clubs stack in free space
52. Queeh hearts on King clubs
53. 9 clubs on 10 diamonds

I WON!!!

Free Cell Game # 10

Hope you enjoy #10

1. Double click on Ace clubs
2. 3 diamonds on 4 spades
3. King clubs upstairs
4. 7 spades on 8 diamonds
5. 6 diamonds on 7 spades
6. 5 clubs on 6 diamonds
7. 3 hearts on 4 clubs
8. 8 clubs upstairs
9. 4 clubs stack on 5 diamonds
10. 4 hearts on 5 clubs
11. Queen hearts  on King spades
12. 9 clubs on 10 diamonds
13. 4 diamonds upstairs
14. 10 diamonds stack in free space
15. 7 hearts upstairs
16. 8 clubs stack on 9 hearts
17. 3 diamonds and 4 spades upstairs
18. Jack spades on Queen hearts
19. 9 spades on 10 hearts
20. 8 hearts on 9 spades
21. 3 spades and 2 hearts on 4 hearts
22. 10 diamonds and 9 clubs on Jack spades
23. 4 spades in free space - put 3 diamonds on top
24. 10 hearts stack in free space
25. 7 diamonds on top of 8 spades
26. Queen spades and Queen clubs upstairs
27. 7 clubs on 8 hearts
28. 6 spades on 7 hearts
29. 3 diamonds on 2 diamonds
30. 4 diamonds on 3 diamonds
31. 5 diamonds stack on 6 spades
32. 6 diamond set on 7 clubs
33. 8 diamonds and 7 spades on 9 clubs
34. Queen spades on King hearts
35. 6 spades stack on 7 diamonds
36. 9 hearts stack in space
37. 4 spades on 5 hearts
38. 6 spades stack on 7 heart
39. King clubs in free space
40. Queen heart stack from the King spades stack on King clubs
41. 6 diamond stack on 7 spades
42. 8 spades in free space
43. 4 hearts and 5 hearts on 3 hearts
44. 10 clubs upstairs
45. 6 clubs on 7 diamonds
46. Queen diamonds on King spades - put stack in free space
47. Jack diamonds on Queen spades
48. 10 clubs on Jack diamonds
49. 6 hearts on 5 hearts
50. King hearts stack in free space
51. 9 diamonds stack on Jack hearts
52. Jack clubs on Queen diamonds
53. 7 diamonds stack - put on 9 diamonds
54. King diamonds upstairs

I WON!!!

Free Cell Game #169

Free Cell Game #169

1. Queen club on King diamonds
2. King spades upstairs
3. 5 spades on 6 diamonds
4. 6 hearts on 7 clubs
5. 3 hearts upstairs
6. 4 hearts on 5 spades
7. 5 diamonds on 6 spades
8. 7 spades upstairs
9. 5 diamons and 6 spades in free space
10. 4 spades on 5 diamonds
11. 3 hearts on 4 spades
12. 4 clubs upstairs
13. Jack hearts on Queen clubs
14. 3 spades on 4 hearts
15. 7 spades on 8 diamonds
16. 2 diamonds on 3 spades
17. 10 clubs on Jack hearts
18. 6 hearts on 7 spades
19. 10 diamonds upstairs
20. 8 hearts on 10 clubs
21. Queen hearts on King clubs
22. 7 clubs upstairs
23. 8 clubs on 9 hearts
24. 7 hearts on 8 clubs
25. 7 clubs on 8 hearts
26. 6 spades stack on top of 7 hearts
27. Jack hearts upstairs
28. 10 diamonds on Jack spades
29. King spades in free space
30. Queen hearts on King spades
31. Jack spades & 10 diamonds on Queen hearts
32. Kind clubs in free space
33. King hearts upstairs
34. 9 spades on 10 diamonds
35. Queen diamonds on King clubs
36. 8 hearts on 9 spades
37. 6 diamonds stack on 7 clubs
38. 8 spades upstairs
39. Jack clubs on Queen diamonds
40. 4 diamonds in free space
41. 3 diamonds on 2 diamonds
42. 4 diamonds on 3 diamonds
43. 2 hearts on 3 spades
44. 4 clubs on 3 clubs
45. 2 hearts on 3 spades
46. 10 hearts on Jack clubs
47. 10 spades upstairs
48. 9 clubs on 10 hearts
49. 8 diamond stack on 9 clubs
50. 6 clubs on 7 diamonds
51. King hearts in free space
52. 8 spades in free space
53. 6 club stack on 8 spades
54. 5 hearts on 6 clubs
55. 3 hearts stack on King hearts
56. Kind diamonds in free space
57. 5 club on 4 club
58. Queen spades on King diamonds
59. Jack diamonds on Queen spades
60. 10 spades on Jack diamonds
61. 9 diamonds on 10 spades

I WON!!!

Monday, May 23, 2011

Glittery Purple Blooming

This is the second Purple Blooming that I have made
since giving the first Biscornu to Tatyana of Mouse
House.  I am always experimenting on what next to
do with a Biscornu. This time Purple Blooming is
glowing! I hope you can see the glitter along the purple seams.
The photos do not show the full impact of the bicornu.
 As on the first Purple Blooming Biscornu - I used a
Swarvoski Pearl. Again I have used the same pearl.
However this time I have put the glitter on top of the
pearl to give it a sun-look. Glitter also decorates
the top of the yellow x's. I dont know if you can see
the glitter in this photo.
 But the yellow x's glow here! I have also
added another magnet to the inside.
 Again for the back I glittered the Swarvoski Pearl.
I used yellow glitter glue for the front and the back.
This Biscornu has turned
out so pretty with the glitter glue. There are about 8
color pens to choose from. I decided on yellow because there
was yellow in the biscornu. You just wouldnt believe
how pretty it looks.  This one was suppose to be mine - however
I gave this Biscornu to Linda. When she saw it she loved
the way it glittered! Enjoy the Biscornu Linda.
I will make me another one. There isnt any telling what
I do with that one.
by conny

Tuesday, May 17, 2011

The idea of Potholder

Scissor Cases is not a new idea. I dont know who
started it - but it makes a great scissor case. I couldnt
find a tutorial on how to make these. But I am sure
there is one out there - I just cant find it.
If you think about it - see if your rotary cutter
will fit in one of these. These potholders will be holding
2 scissors in 2 separate pockets. So in case
you cant find a tutorial either - I have given some directions
on how to make them.
This is so easy that you probably dont need my
directions however for those that do - here it goes.
 Gather you up some potholders. I think that any
size will work. Just keep in mind the the smaller
the potholder - then its use would be for small scissors.
The bigger the potholder is for the bigger scissors.
 The 2 flowered potholders are 7 inches square.
The white potholder is a little under 7 inches square.
The purple potholder is 5.5 inches X 6 inches. None of
these measurements include the loops.
 Basically the first thing that you have to do is to
fold the left side into the middle. Just place your
scissors on the inside to see if they fit - but keep
holding it.
 If it feels good to you, then finger press the left
side down. Now fold over the right side down
onto the left side and make sure that the bottom
of the potholder comes to a point. You dont want a
shart point - just a pretty point.
Place a few pins on it to hold it together. Thread
your sewing needle with good thread that matches
the potholder. I use Candle wicking yarn so my needle
is a little fat.
 If you felt like it you could glue this down but I prefer
to stitch it in case I want to reuse it later. With your
threaded needle start at the top of the fold and stitch
down the length of the potholder.
 When you get down to the bottom just pause for
a couple of seconds. Finger press and knot off the
thread.
 Place your scissors inside of the little pocket to make
sure that they fit like you want them to. My scissors
do not fit properly so I have to anchor some stitches
beside the hanging loop.
 Now fold over the right side onto the left side &
try to make it pretty. Finger press it closed.
 Start at the bottom where the point is. Place your
knot on the inside. Start stiching that point closed.
 Keep holding it closed & continue stitching up.
 Once you get close to the top of the flap. Then stop.
At this point you can stitch straight up to the point
of the flap OR you can fold this piece down & hold
it down with your finger to stitch a little open flap.
On this white potholder I decided to stitch all the way
up to the point of the flap.
 Even though you cannot see the little scissors - the
scissor fob lets you know that there are a pair of
small scissorrs tucked inside. If you use a white
potholder you can decorate it with cross stitch,
yo-yo's or any kind of trim that you would like.
I have decided to leave mine simple & bare.
Enjoy!

I won alot & then I lost!

Yep I was on a roll. This has been the most games
that I have won over a period of days.
I knew my luck was going to run out!
Sorry for the glare.
I took so many photos but these 2 were the best
out of all of them.

Free Cell Game # 335

Here is game # 335

1. Place the Queen clubs on the Kind diamonds
2. Put the 8 spades on the 9 diamonds
3. Put the 7 hearts on the 8 spades
4. Put the 3 spades on the 4 hearts
5. Put the 2 hearts on 3 spades
6. Put the 5 diamonds on the 6 spades
7. Put the 10 spades upstairs
8. Put the 8 clubs upstairs
9. Put the 10 spades in free space
10. Put the 7 hearts stack on the 10 spades
11. Put the Queen diamonds upstairs
12. Put the 9 clubs on 10 hearts
13. Put the 10 diamonds & Jack clubs upstairs
14. Put the Queen diamonds, Jack spades & 10 diamonds in free space
15. Put the 9 clubs on the 10 diamonds
16. Put the 5 diamonds & 6 spades on 7 hearts
17. Put the 4 spades on the 5 diamonds
18. Put the 10 hearts on the Jack spades
19. Put the 6 clubs upstairs
20. Put the 9 spades on the 10 hearts
21. Put the 2 clubs on the Ace clubs
22. Put the 4 clubs upstairs
23. Put the Jack diamonds on the Queen clubs
24. Put the 8 clubs in free space
25. Put the Queen spades upstairs
26. Put the 7 diamonds on the 8 clubs
27. Put the King hearts upstairs
28. Put the 3 hearts on the 2 hearts
29. Put the 8 hearts on the 9 spades
30. Put the 6 clubs on 9 diamonds
31. Put the 7 spades on 8 hearts
32. Put the 9 clubs stack on King clubs
33. Put the King hearts & Queen spades in free space
34. Put the Jack diamonds on the Queen spades
35. Put the 4 spades stack on the Jack diamond stack
36. Put the 7 spades stack in free space
37. Put the Jack spades & Queen hearts in free space
38. Put the 7 spade stack on Jack spades
39. Put the 5 hearts on 6 clubs
40. Put the 4 clubs on 5 hearts
41. Place the 8 diamonds on 9 clubs
42. Place the 8 diamond stack in free space
43. Place the King clubs in free space
44. Place the 8 diamond stack on King clubs
45. Put the Queen clubs & Kind diamonds in free space
46. Put the 4 diamond on the 5 spades
47. Put the 6 diamonds on 7 spsades
48. Put the Jack hearts on Queen clubs
49. Put the 7 clubs on 8 diamonds
50. Put the 4 hearts on 3 hearts
51. Put the King spades in free space
52. Put the 5 clubs on the 6 diamonds
53. Put the 10 clubs on the Jack hearts
54. Put the 6 heartrs on 7 clubs
55. Put the 4 diamonds & Jack spades on 6 hearts

I WON!!!!

Free Cell # 15001

There arent any photos for this, just my
directions. To understand my meanings
be sure to check prior game numbers

1. Place 4 clubs on 5 hearts
2. Place King diamonds upstairs
3. Place 3 hearts & 2 clubs on 4 clubs
4. Place 9 hearts on 10 spades
5. Place King Spades on 10 Spades
6. Place the 9 clubs on 10 diamonds
7. Place Queen of Spades upstairs
8. Place King diamonds in free space
9. Place Queen of clubs on top of King diamonds
10. Place the 3 diamonds upstairs
11. Place the King clubs upstairs
12. Place 6 spades upstairs
13. Place 2 hearts on Ace hearts
14. Put the 6 spades on top of 7 diamonds
15. Put the 2 clubs upstairs
16. Put 3 hearts on the 2 of hearts
17. Put 3 diamonds on 2 clubs on top of 4 clubs
18. Put 4 hearts on 3 hearts
19. Put Queen diamonds upstairs
20. Put 8 diamonds on 9 clubs
21. Put 8 spades on 9 hearts
22. Put 7 diamonds & 6 spades on the 8 spades
23. Put 5 hearts on the 6 spades
24. Put Jack diamonds on Queen clubs
25. Put 3 spades on the 4 diamonds
26. Put the King clubs in free space
27. Place the Queen diamonds on King clubs
28. Put 5 spades on the 6 hearts
29. Place the Queen spades upstairs
30. Put the 10 daimond stack in free space
31. Put the 10 clubs on the Jack diamond
32. Put the 10 diamond on Jack of spades
33. Put the Jack spades on the Queen diamonds
34. Put the 6 diamonds on the 7 spades
35. Put the 7 spades on the 8 diamonds
36. Put the King hearts upstairs
37. Put the 2 diamonds on the Ace of diamonds
38. Place the King hearts in free space
39. Put the Queen spades on the King hearts
37. Move the Queen hearts upstairs
38. Put the 3 clubs on the 2 of clubs
39. Put the 3 diamonds on the 2 of diamonds
40. Put the 4 of clubs on the 3 of clubs
41. Put the 5 hearts on the 4 hearts
42. Put the 5 diamonds on the 6 of spades
43. Put the Jack hearts on the Queen of spades
44. Put the 10 spades stack on Jack hearts
45. Put the 10 diamond stack on the Jack spades
46. Put the 5 clubs stack on 6 diamonds
47. Put the King of spades in free space
48. Put the Queen hearts on King spades
49. Put the 9 of spades upstairs
50. Put the 7 of clubs upstairs
51. Put the 9 diamonds on 10 of clubs
52. Put the 7 clubs on the 8 hearts
53. Put the 8 of clubs stack on 9 diamonds
54. Put the Jack clubs on Queen of hearts
55. Put the 9 spades in free space
56. Put the 7 clubs on the 8 hearts
57. Place the 8 clubs stack on the 9 spades
58. Put the 6 hearts stack on 7 clubs
59. Place the 10 hearts on the Jack of clubs

I WON!!!!


Friday, May 13, 2011

No Peeking Tatiana!

Well, Tatiana's gift is well on its way to her New Home!
Hopefully she receives it soon. When I designed and
stitched this Biscornu - I had her in mind. Here it was
in the beginnings of Spring - and where she was living
there was new found SNOW!
Who couldnt use needles and a Biscornu. I hope that
you like all of the things that I have sent to you, Tatiana.
by Hopblogger


Sunday, May 8, 2011

Tatyana of Mouse House

sent me a pretty pink & green scissor fob, some
Valdani floss & a pattern book from Zweigart.
Its a nice little swap. In a few days I will show
you what I have sent her.
Thank you Tatyana!


by conny

Tuesday, May 3, 2011

If you have 15 minutes....

then you can stitch up this bag. I have been
making these bags for about a year now.
My daughters & my grandchildren use them.
You can make these bags different ways but
I always opt for the easiest & the quickest.
I reuse anything that I can - including those
ribbons that come from those fancy bags at
department stores.  In fact that is where these
ribbons came from. Read these directions till
you understand them. They are long only
because I want them to be clear.
The directions for this bag are different than
the other bags that I have made in the past.
This bag does not close - but you can
certainly make it to where it does close.
This bag is also unlined. Your materials
list is really small.
Materials for one bag:
a pair of pants or capri's with side pocket or pockets
ribbon
sewing machine
cutting scissors
pins
one safety pin
---------------------
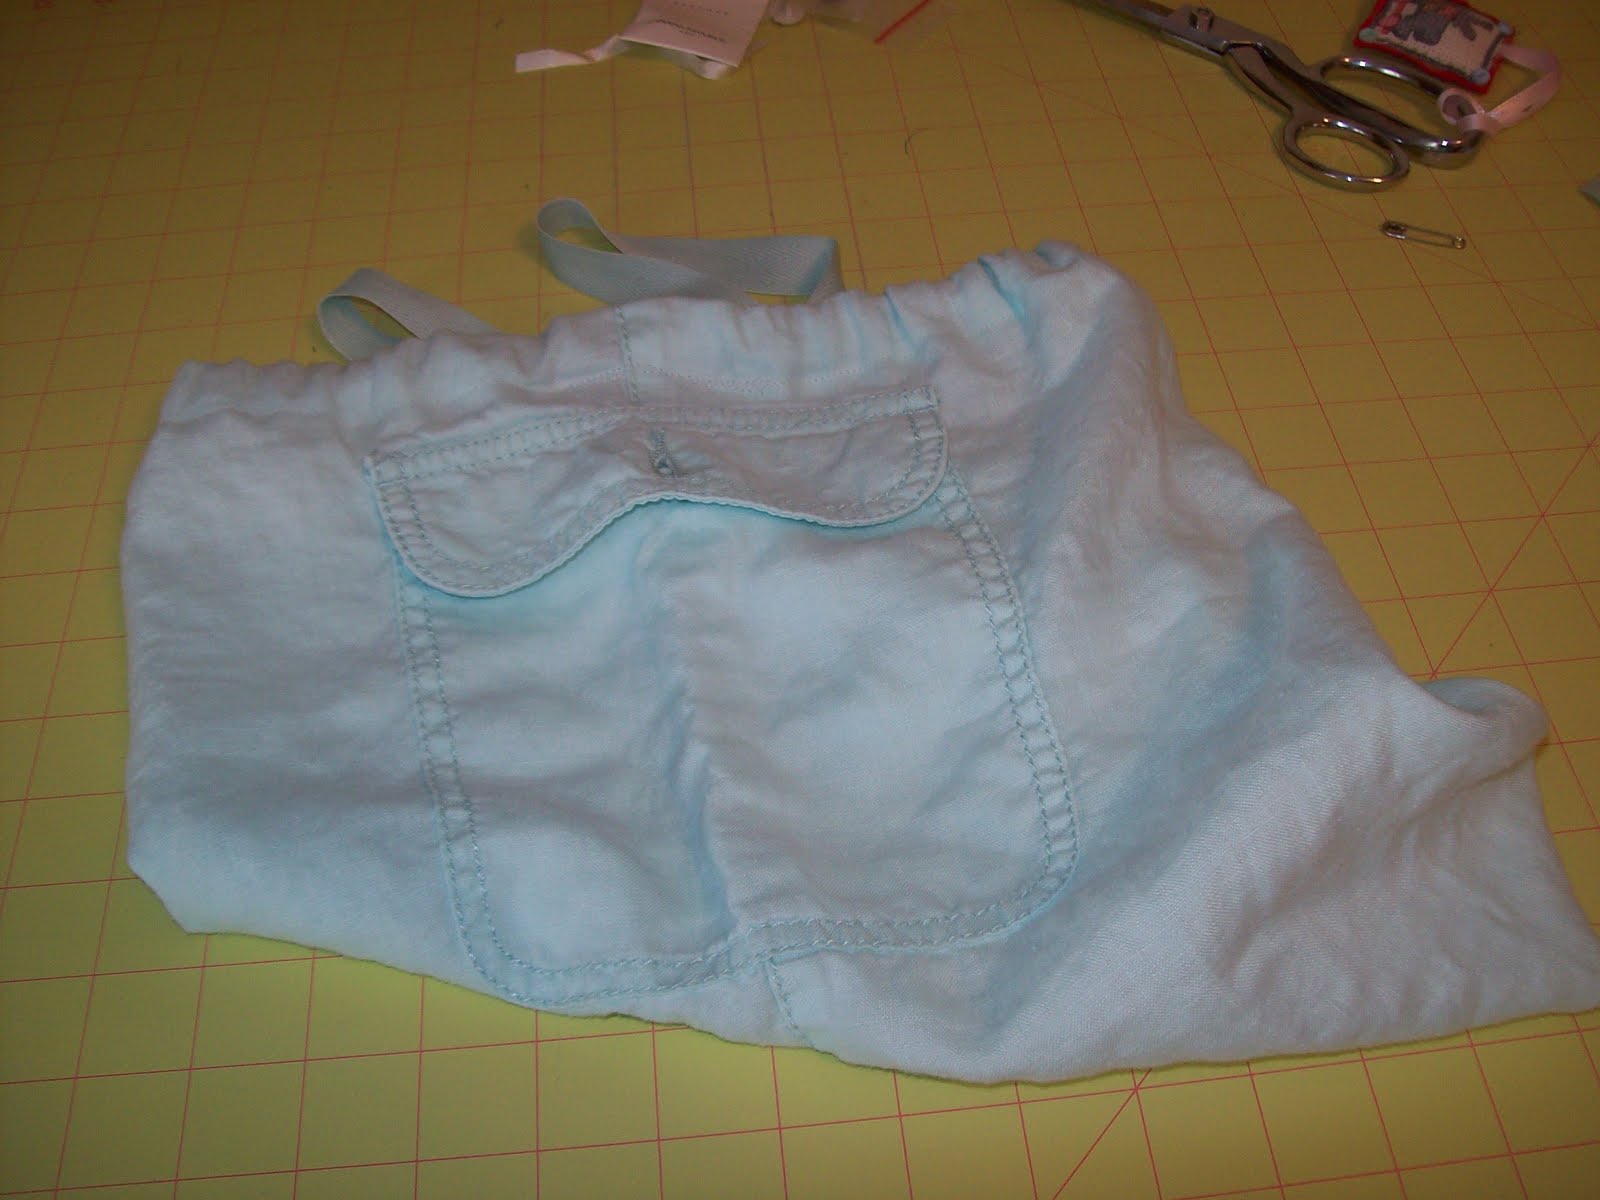
 This is just another view of the bag.
 Generally all of these types of bags I make - are made
from long pants or capri's. The only ones that I cut up
are the items that have side pockets. These particular
pants are a soft baby green & are made from linen.
They are still beautiful & so soft!
Linen is my favorite fabric & I have tons of it!
So grab a pair of your pants or capri's that has worn out or you
have outgrown. Just make sure that it has a side pocket
or many pockets on the side. If your pants have pockets
on both legs - then thats a bonus. You can get 2 pretty
bags! These pants only have a side pocket on one of the
legs so I will only be cutting the one side.
So lets get started!
Take your pants & fold them to wear you see
the side with the pocket. Now look at the pants & locate
the side pocket. It is here where you must decide how big
do you want or need your bag to be. Now on this particular
pair of pants the pocket is located on the upper
thigh. So to keep the bag from being too long
(because I dont need a long bag),
then I will cut off a lot at the bottom of the pants.
 To cut - look at your cutting mat. Make sure your
pants are straight & even on the mat.  No bulges!
Just decide
where you want to cut it - & use those lines
as a cutting guide. But be careful fabric
can slip if its not pinned down. Since these
are just bags - I dont worry about too much
slippage or being fussy.  Just try to cut as
straight as you can. Cut the bottom off if you
are ready. Now go to the top of the pants leg & cut
as close to the crotch as you can.  As you can
see on my pants there is only about 4 inches from
the top of the side pocket to the crotch where I cut
it.
 Now this is your bag - notice that the side seams
are already there - you dont have to worry about
that. And they are probably very pretty seams.
Make sure that you turn the pants to the wrong side!
At this point, run a line of pins from one side of the bag to the
other side. Go to the sewing machine and sew a straight
stitch from side to side. Afterwards remove the pins.
 Now cut off any excess fabric.
 For good measure - I stitched over my previous stitching
with a couple more stitchings just to give it strength.
Also I zig-zagged it. You can use fray check here if you
want to but you dont have to.  The bottom is finished.
 At the top - fold over and turn under a small bit of
fabric to hide your raw edge & pin it. Place your ribbon
on top - make sure that you have enough of a
casing so the ribbon can move. You dont want a fat hem but
you dont want a skinny hem either.
Now pin the edge all the way around the top of the
bag. Sew the hem down & remove the pins as you
go - BUT start & stop at each of the 2 seams. Leave
small openings here to allow for the ribbon.
Decide on how long you want your ribbons to be.
Cut them if necessary. Cut 2 ribbons.
Put a safety pin on one of your ribbons so you can thread it
thru one of the spaces in the seam. Come out on the other
side. This is one ribbon & you must thread thru the seams
2 ribbons. One ribbon goes thru one side & the
other ribbon goes thru the other side. So that one each
side of the bag there are 2 ribbons that come out from
the seams that were left open.  See the next photo.
I hope that you can see what I have done here. Now
go to one of the seams. Match up the 2 ribbons & sew
a seam down them. Here you are connecting the 2 ribbons
together. Sew them together multiple times. You dont want
them coming apart. Then stitch up the ribbons at the
other seam.
Now its time to hide those ribbon seams. On the other
side seam pull of the ribbon until the one seam goes
into the hem. Now do the other side. This should
hide those ugly ribbon seams.
See - those seams are going bye-bye!
Now pull out some of the ribbon on one of the side
seams. Do not pull the side that has the ribbon seam
in it.  Do the same to the other side.
What I did here first was - to gather up the top edges
by pulling the ribbons. Make sure that the ribbons even up
on each side. Once it is gathered like I want & the ribbons
are lined up evenly -
then on one side I align the ribbons together
& sew that side down along the seam as you see here.
Then repeat for the other side.
I hope that you enjoy making this bag.
by conny