Showing posts with label sewing. Show all posts

Tuesday, January 18, 2011

What to do with a pillow

that is pretty but not in your color
pallette. Well thats not completely true.
The white is starting to come into my home.
But the golden color is not. However
those cupids are so darling - I just cant
resist them. Hate to cover them. I have had this pillow
forever. Or at least it seems that way. Time for a change!
What to do. Thats easy enough. Just take
2 placemats. Yes I did said placemats & use them
to cover the pillow. These placemats were white on both
sides but one side had a little stain. The good thing about
using placemats is that - on the inside you dont have to worry
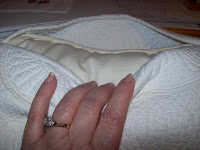
about the fabric fraying. Zoom in you can see the edges are
bound together. Be sure to leave a big enough opening!
Stuff that pillow in there anyway that
you can. See its in there.
Last - just sew it closed. Its a brand new
pillow.
Its a great lumbar pillow for the computer
chair. Ahhh it sure does feel good!
Looks pretty too.

I hope you start looking at those placemats a
little differently from now on. Another
thing that I would like to say is - I hope that
all of you that do Miniatures really consider using
SCRAPBOOK PAPER for those walls that need wallpaper.
Dollhouse wallpaper is about $15.00 a roll.
I only used 5 sheets of scrapbook paper
for the entire apartment. Each sheet was only 69 cents each.
Thats a great savings. And I like it that not everyone
has this in their dollhouse! And I applied it to the walls with
Mod Podge. Also think about these placemats.
Zoom in on this pillow - & you
will see a nice pattern. What about using it for
MATALASSE' bed covers for your miniature beds!
The pattern is just the right size. Now
if I could only find those other 2 white
placemats - then I could stitch them up for those
naked dollhouse beds!
Thank you for visiting me.
by Hopblogger

Sunday, June 27, 2010

This week

I just happen to like the colors of black & white with touches of pink.
I love Toile & this project just uses those tiny scraps of samples that
I obtained at the fabric store. I only had 4 small samples to work with.
Sometimes you have to take a break from cross stitching & do
something fun & different - also quick & easy.
The top was enhanced with a strip of thin black leather. A Yo-Yo
with little pink beads is stitched on with white thread.
Inside another tiny Yo-Yo holds a covered magnet. Its beads
match the ones on the outside front lid. White flannel is
merely draped on the inside. It is not tacked down.
The basket is tiny only measuring 6in X 6in so the pieces
inside had to be small. The box houses a small scissors fob, a tiny
pincushion & a small needlebook that supports only a couple of
needles. Just cut those samples in half with a pair of pinking
shears - except for the needlebook. The back of each piece
mirrors the front with the black toile. Sew 3 sides together a little away
from the edges, then stuff, then sew the last side. On the scissors
fob be sure to use ribbon or floss for the hanger part. I used the thin
black leather strip as what is on the front of the box. The
little flowers are of pink fleece with a couple of pink beads inside each.
Lately I have been using flannel & fleece.
by Hopblogger


Take a cute

& simple white wicker LITTLE basket. Cut out cardboard
to match the shape & cover it with white cloth. This becomes the lid. Cut out
another shape
& set aside. Affix the already covered white shape to the basket with
lace. Just put the lace thru the sides and hot glue down or sew it down.
Take the other shape & pad it with a layer or two of high loft batting.
Center a special piece of fabric on top and glue it to the back of the
shape. Glue the lace on from the backside. When finished glue the piece
down onto the lid that you have already made. Add a bow on top for
decoration. You can stop here. The box in white is very
pretty. But I choose to take it a step further.
by Hopblogger


Monday, June 7, 2010

Occasionally, I like to make....

my own fabric. Have you ever tried it. If not, all you do is
take a large square of white or unbleached cotton sheet or muslin. The
size of the square is up to you. For me, I generally use a
17inches X 17inches. This gives me plenty of room to make my
items small or large. Sometimes there is plenty left over for other
projects. After my square is cut - just take strips of fabric skinny or
fat and sew each strip down upon the square until the square is no
longer visible. I use scraps of fabric from many things.
(also be sure to catch all seams so there isnt anything missed).
Then just cut it like its fabric! You cannot mess it up.
My little sewing set is small. The square of fabric was half used up.
Also notice that I didnt hem anything. It is scrappy & fun!
So quick & easy.
All of these scraps are from the 80's. The ties are skinny
pink shoelaces that was in a prior garment of long ago.
The color was too pretty to trash. About time that I used them.
Everything fits neatly inside the bag. Maybe I should have lined
the bag? - nah. This way if I must fix the bag in the future
all I have to do is to sew a patch on top & it would be easy to
sew from the inside.
Try it - you just might like it!
by Hopblogger

Friday, May 7, 2010

DO You Remember these....

Have you got any idea - of what to
do with a cloth TOILET ROLL HOLDER - especially a pretty one!
This one is made from Linen & has pretty ribbon embroidery.
The lace is a tatted cotton. I never used it as a toilet roll holder -
it has always been put away - still brand new. There are many
ways to fold this up - I show you picts of 2 ways - but it can
also be rolled up. Look at the next post to see what I did with it.
Mine is simple.
by Hopblogger


A Linen Needlebook

This is just one idea - of what to do with that toilet roll holder. It has many
uses and since I cannot cross stitch on linen (because of
my eyes) - this seemed to be a perfect idea. It didnt take long to make.
Be sure to click on photos. The 2cd picture shows the reverse side.
This was the first time that I have ever stitched a blanket stitch - so its
not perfect you guys. The place where you stuff the toilet
rolls is where you place your objects that you want to store.
It holds needles, pins, scissors, floss - lots of things!
Do you notice the ring is
still attached. The reason
for this is because you can still hang it up.
I closed mine with some old snaps but you could use
some pretty reasons, rick-rack or whatever you choose.
If you like this please refer others to this website. I hope that
you can get some ideas - would love to see some pics of yours.
Send me a picture & I will post it here - just bet that some of you
could really make this pretty!
by Hopblogger


Monday, February 22, 2010

My little wooden chest

was too scantily dressed. It needed a new makeover. The
colorful threads with their matching bobbins add much needed
color. There is a little plastic case across from the needlebook
that holds buttons. This little case was used to house film negatives.
For those of you that remember - whenever you took your film
in to get developed they would put the negatives inside these little
plastic cases with lids. If you can find them they come in handy -
are good for many uses - especially since noone uses them anymore
for negatives. They can hold needles, safety pins, and thimbles.
Use your imaginations.
by Hopblogger


Sunday, February 7, 2010

It was time

to accessorize the little wooden sewing box. Lace is wrapped around
clothes pegs. The little walnut pincushions fit perfectly in one of the
sides. The needlebook also looks right at home. I took those needles
out of that needlebook & now it holds only safety pins. The needles were
put in the little wooden needlecase. My upholstery is not perfect - but I hope to
get better as I work more with the cardboard. When new
ideas come to my mind then things will change inside the little box.
by Hopblogger


Friday, February 5, 2010

CUT, GLUE & COVER

cardboard. Pad those drawers in those sewing chests. This little
chest measures 8 inches long, 5 inches wide & 5 inches tall. So cute
& little. Pics are little deceiving in noting the color of the little sewing
chest. It is a deep reddish brown. You might remember the red cotton
dishtowel from a previous project. I think that these wooden sewing
chests look very nice when you upholster them. Padding them gives an extra
added little personal touch.
by Hopblogger