Wednesday, December 5, 2012

"The Adventures of One-Eyed Jack"

MY BOOK HAS FINALLY BEEN
PUBLISHED!!
 
I AM VERY EXCITED!! This is
my second pulished Book and I hope
this book is a huge success!
If you would like to purchase it or
see where it is published then please
go to the link listed below.
Thank you so much for supporting
me!!
Many hugs and kisses,
Conny

Saturday, December 1, 2012

Christmas Angel toppers

Hello Everyone!

MERRY CHRISTMAS!!
 
Today's topic is Angels.
I know everyone at one point in
time has had at least one of these
Christmas Angels on their trees!
There are so many different kinds and
they are all beautiful. They get prettier
every year. I happen to love
the lacy ones, but over time being stored
in your attic, they become yellowed and
age really fast. The inside plastic becomes
brittle and yellowed. They may have lost the
pretty bows that once adorned them.
The lace begins to look tattered. Well I
have many of these angels.
At one time I
put Angels all over my tree - so I have plenty of them.
When I bought them, I cut the inside
plastic away and just sat them on the 
branches. My tree was gorgeous that year! Of course this
was many years ago that I did this. Every
year my ornaments seem to change.
 
This year I noticed that I had a few
lovely Angels that had yellowed really bad!
I know that you cannot see the yellow
but they are yellowed!
The 3rd picture
shows some yellow spots just above the
lace. Their hair is still very nice, but
I do not have any intention of remaking
over these Angels.
 
Well - it is time to reuse these Angels!
So I got to work. My trusty paper scissors
helped me cut away those yellowed plastic
cones. Then I grabbed my little red
handled pliers. That is my favorite
(tear-up) tool of destruction!


 This was the only Angel that was small. I tore away
the inside lights also. I will use them somewhere
else. The dress looks white but I assure you it
is yellow! I do not know why my pics have made
them bright! Strange!!!
 The yellow plastic came out easy in
this little doll. The holes in the plastic
held the lights. Most of these plastic
things come out really easy with very little
glue to clean out of the heads or body.
 Here are the bodies. Yep - I tore up all 4 of them!
I will donate their heads, arms and what little bodies
they have. I will also donate the wings.
Crafters would love to get their hands on them and
remake them over.
I know it is Christmas - but these little dolls could
also be made into HALLOWEEN WITCHES for
next year. Put on your thinking caps and imagine
it. Be sure to tear off the gold wreath on the
little angels head if she is not going to be an Angel
anymore.
 Hoo-ray!! Tide and a little bleach whitened them
up very nicely! Even the yellow spots came out.


 I noticed that the fat wings to the left is still a little
yellow but it is brighter! It could be that those wings
should not have been bleached.
 The bodice and sleeves on this dress did not clean
up like the lace. I remember the bodice and sleeves
being a beautiful white. It might be because of the fabric
it is. And so I will cut away that fabric.
Oh well - they still look better.

These laces are going to be used for my miniature
dresses that I am going to make. The lace will look
gorgeous!!
 
Have a lovely night with you and yours!
Hopblogger


Thursday, September 13, 2012

A Log Cabin Dream

This pattern is called LOG CABIN DREAM.
I am
positive that all of you know this quilt pattern
as simply Log Cabin. .
Log Cabin Quilts are precious to us as they
symbolize our Home. So warm and loving.
So why not stitch one up!
 
Hello Everyone!
Thank you for your sweet comments and
concerns. They are truly appreciated!
And Thank you for following me.
Boy, when my eyes get better I will
have heaps of cross stitch work to
do!
 
Make a biscornu or a just a regular
pincushion. The choice is yours.
Log Cabin is adaptable to either.
And you can use the colors that I give or
use the colors that you choose.
 
THIS LOG CABIN PATTERN IS INTENDED
FOR USING UP ALL OF YOUR LEFTOVER
THREADS IN YOUR JARS!! For each block
just make sure that you stay in the same
color family.
 
FRONT
 
Back
 
PLEASE READ AND UNDERSTAND ALL
BEFORE YOU START.
6 cross-stitch blocks form the basis of the pattern.
The blocks are surrounded by 5 narrow strips
or bands around these blocks. The final large
outside strip is stitched with #3806 Lt Cyclamen Pink.
Then the narrow last strip is stitched in
black. Use black floss to stitch the front and
back together.
On the narrow strip with the white  that you see,
there are no symbols. I intended for this color
to be stitched in white.
As in a quilt all of the centers in each block
are stitched in red.
On each block beside the red centers your colors
should be stitched with the lighter color beside the
red and then graduate out with the medium and then
dark of that floss color.
FRONT: DMC 307, 310, 605, 604, 3801, 3846, 3845, 3844,
211, 210, 209, 3806, 3805, 3804, 3864, 3863, 3862, 3849, 3848,
3847, 3836, 3835, 3834, 3855, 3854, 3853, 157, 156, 155,
372, 371, 370, 415, 414, 413, 435, 434, 433, 445, 444, 504,
503, 502, 519, 518, 517, 761, 760, 758, 742, 741, 740,
761, 760, 758
BACK: DMC 310, 3801, 3846, 605, 519, 435, 211
 
I hope you enjoy stitching this pattern. Thank you
for visiting me!
Hopblogger


Tuesday, September 4, 2012

Eyes are still healing

and they are taking their sweet time!
Just thought that I would let you
know that I have not forgotten this blog.
by Hopblogger


Monday, July 30, 2012

Plastic Containers can get expensive!

Hello Everyone! How are you
doing? Hope you all had a lovely
weekend.
A big Welcome to all of my new
followers. Hope you find an idea here
that you like. Or perhaps one of my
ideas sparks an idea for you!

Yea - how many of you want and try to
organize your crafts only to find that the
containers are expensive. If you need alot of
them they can get pricey.
Today I want you to take a good look
at these kinds of plastic containers.  I do not know
if you use them but I surely do. They are good
1 pound containers to use in your sewing and
craft rooms or just about anywhere you need them.
 I wash and dry them although their insides never
get dirty because the ham is placed in plastic wrap.
The cardboard top comes off easily and the glue
residue also peels off so easy.
 I use these plastic bins for my mini sewing projects
as well as for storing little stuff that has no home.
I have been collecting these and using them all over
my home.
Store fingernail polish and other supplies in them and
store under your bathroom sink. Use one for just
cotton balls or Q-tips.
You can store beads, lace, bobbins, thread spools in
them. You name it and you can use these over and
over again. And if the plastic ever breaks which I am sure
it probably will - just go buy some more ham.
This size has been around for awhile and there are
other sizes also.
Now thats what I call a good buy - great tasting
ham and a project container to boot!!
Now this plastic container is a great deal!
I already have 14 of these plastic containers in use
in my craft area alone. Store your food left overs in them.
Also when my daughter eats over
and wants to take some good yummy food home with
her then she uses one or several of these to put the food in.
You never have to worry if you do not get the container
back. If you use these already let me know what
you are using yours for!
Thank you for visiting me!
Hopblogger


Thursday, July 12, 2012

I GOT TAGGED - LETS PLAY

Hello Everyone! How have you been?

First I would like to welcome all of my
new followers. Sorry that I have not
posted lately - as you can see I still
have not gotten my eyes back. Yes -
they are still healing. And it is going
along very, very slowly!!

This week - there is no picture.

Sweet Akila of Mostly Cross Stitch - (her
blog here:
has kindly tagged me.
Thank you Akila.

Here are the rules:
1. Post the rules.
2. Answer the questions the tagger set for you
in their post.
3. Come up with new questions.
4. Tag 11 people and link them to your post.
5. Let them know you tagged them so
they can answer the questions.

Here are the answers to Akila's questions that
she asked of me.
1. I have not tried many of the finishing
techniques. They are very pretty but I am a
woman that tries to keep everything simple
and quick.
2. My crafts vary from day to day and year to
year as does my interest in them. I try to remake
things over, mix them up and or reuse my
everyday objects into functional pieces - not
just for show.
3. No I have never participated in exchanges or Sal's.
It is something that I would like to do - have just
not gotten around to it yet.
4. If we are talking about cross-stitch. Well I have
not done any of that since I got my eyes fixed.
I am looking forward to stitching again. I cannot
say how many other craft projects get finished
in a year because most of my efforts are
being put into my miniature blog.
5.  Michaels or A.C.Moore because they are in
my area.
6. I never change the floss in any of the kits. On
occasion I do change other things to suit my
style and colors.
7. When I stitch I like it quiet. This way I can
stitch faster with nothing is taking my attention
away from what I am doing.
8. Before surgery on my eyes - cross stitch
followed me everywhere I went - including doctors
visits, airports or my sisters house.
I always keep a small kit in my purse. They
work up fast.
9. I have not worked on JUST beading projects.
My beads get used in other things.
10. I used to be able to stitch 20 to 30 hours
a week. Now that time is filled up with my
miniatures and glueing.
11. I have visited one country. I have to visit
other countries before I can say which is my
favorite.

Okay - now I have to give a list of questions to
those people whom I have tagged. Here goes.

1. What was the first craft or stitching
project that you ever
started and finished? Name that item.
2. How many years have you been
crafting or stitching? And who was the
lucky recepient to receive the item.
3. When you stitch or craft anything -
and make a boo-boo - do you finish it
or throw it away?
4. How many projects do you start
and never finish?
5. Out of all the crafts and stitching that there
is - do you have a favorite?
6. What do you do with all of the stitching
and craft projects that you finish. Do you
give them away, store them in a drawer, or use
them??
7. How bad is your creative room?
8. If you have a room just for yourself to
create or to stitch in. Does that room only
hold those supplies or does it hold a mish-
mash of other things that do not get used?
9. Are you a pack-rat?
10. Is your creative room neat and orderely or
haphazard and disorderely?
11. What is your favorite book or magazine?

Well, I tried to think of a couple of more
questions but I lost there. Here are the ladies
that I tagged.

1. Catherine of DiamondC.
2. Marlene of Poppy Patchwork.
3. Lori Bei Durst of Rachel and Pia's Cottage
4. Eliana of Terra Dos Gigantes (Land of the
Giants)
5. Faith of Faithfully Stitching.
6. Chris P's Mini's and More.
7. Tatyana of Mouse House.
8. Vicky of Kiwi-crafters.
9. Rita of Stitchdays.
10. Terri at RosyStitches.
11. Carmen of mi pequena evasion
(my little escape)

Now all I have to do is notify them. God
bless you all!
Thank you visiting me!
Hopblogger


Monday, June 25, 2012

Elise Stitching

I have been teaching my grandaughter
Elise how to hand stitch a quilt.
Of course the quilt is pint size but it
is so overwhelming for youngsters
to start with a large quilt. However eventually
she will be stitching on a large quilt.
I am very proud of well she is coming along with it.
Her stitches are very tiny.
A very good student she is! And look how hard
she is concentrating.
Hopblogger


Wednesday, June 20, 2012

You just gotta love Hydrangea's

My hydrandea bush in my backyard
has gotten out of control!
This blue hydrangea bush is just one huge bush.
Apparently it loves my soil.
I love the cottagy look that it gives.
If it keeps growing out into my yard I will have
to trim it back considerably if I want to carry the
trash can around to the front of the yard. Every year
this bush grows bigger and bigger. Maybe I will
trim it back next year to see how much bigger it
grows!
 On the left can you see the purple ice caps Hydrangea
bush. The white heads is a white hydrangea - however
still the blue hydrangea is trying to grow over both of
those bushes. Perhaps I need to just have this garden
for the blue hydrangea's.
I hope that you like my garden pics. Hydrangea's
are beautiful - go plant you some!
Hopblogger


Thursday, May 17, 2012

A New Biscornu

Hello Everyone and welcome
to my blog. I hope that you enjoy your
visit with me today.
Please keep in mind that my eyes
are still not up to par and so
I am unable to stitch this up.
Several times I have went over
it and so far there are not
any mistakes. If you do find
one please let me know
so I can correct it.
Feel free to change the
colors to suit your taste. And
use whichever side you like
best for the front or the back.
I hope you like
PLAYFUL TULIPS!


Happy Stitching!
Thanks for visiting me.
Hopblogger

Saturday, May 12, 2012

TUDOR

Do you like the TUDOR era.
Most people do. This is my youngest
daughter Pepper. Pepper loves the
Tudors and watches the series on
television. Pep is modeling her Tudor gown
and it is 90 degrees outside!
Surely way back then when the women
of England wore these fabrics and gowns
that it was much colder. I hope that it was.
I would burn up in this gown if I wore it!! 
She had to make this for her Drama class.
And she passed with flying colors!!
The pattern that she bought did not look
anything like this. She had to also
design her gown and this is what
she did.
My only role in the making
of this gown was to instruct her what to do
in order to get the look that she was looking
for. And I was happy to be a part of it any
way that she would have let me. 
The entire gown is lined and was made
from upholstery fabrics and wool.
Also my sewing machine would NOT sew any
of this fabric because it was so thick with the trims
so Pep had to HAND-SEW it all together!!
She used crochet cord and a large needle
to sew it all together.
Doesn't she look beautiful!!
 These are the bell sleeves that she trimmed with
red trim. Can you just imagine how much
fabric that this took. The sleeves are actually 3
sleeves. The big bells that hang down. The skinny
sleeve that goes up her arm and plus there is a
long green sleeve underneath. Plenty of trims
in the sleeves. In my opinion since
many of these gowns never made it to our
lifetime to view - and what ones we do see have
different fabrics in them that -
 it is a possiblilty that they recycled
many of their gowns to make into newer
gowns. Perhaps that could explain why many
of these gowns had so many different colors.
I only believe that recycling has always been going
and that recyling is not a new thing.
 Her bell sleeves are open for you to view
the front of the gown. The fabric colors
are chocolate brown, a golden brown &
a paisley. The cream in her bodice is
100% wool and it is lined. It has a small
little band of lace that matches the bottom
of her gown. To tie in the sleeves she sewed
some bands at the bottom and also trimmed
it in red trim. There is a lot of small and
large green trim also in this gown. The
gown has lots of detail. She was thinking
about making a belt to go high above
the waist but she did not have enough time
to sew one of them.
 She lifted up one of the bell sleeves
so you could see her inner sleeve.
Thick fabric with cream wool for the
inner lining. We did not know when
buttons were invented so she took small
tassels from a trim and sewed them
on so they would not dangle. They almost
look like buttons.
 The back of the gown is the most dramatic
part of the gown. Underneath this green
train that is trimmed with red - there is also
another train that is brown. Can you see
it behind the red lining.
 Maybe you can tell on this pic how the chocolate
brown sweeps back.
 She is heading up the steps to the front of my
house. Zoom in to see the detail with the
little tassels at the top of her train. We could
not help seeing her bra strap.
 I almost forgot the hair piece. I instructed
her also on how to do this. This was
the easiest of her entire project taking
her about 10 minutes to construct.
She also had to make a power point and
do a story on the movie that she watched.
The era was HENRY V. And the beautiful
actress Emma Thompson played Catherine.
I hope you enjoyed these pics.
Hopblogger


Sunday, April 29, 2012

What to do with a Waverly Valance

AGAIN - I WOULD LIKE TO WELCOME
MY NEW FOLLOWERS. IT IS A PLEASURE
FOR YOU TO JOIN ME.

I am not a stranger to buying curtains, valances or
shades at a Charity Store. In fact I love these
types of stores. And in todays economy you
need to get a bargain for your money.
And I will also buy it even if it has holes.
In fact  where there are holes in them then
I am more apt to cut it up! And I have been
cutting these things up ever since the first
day that I was married. It was my calling!
Nothing was safe around me except for
the 1970's polyester. I despised that rough
cold material. Anyway if you need or want
large amounts of cloth at a good price then
this is the way to go.
All you have to do is wash the stuff up and use it.
Sometime ago I came across a very long panel of some
beautiful Waverly valances. So sorry that I forgot
to take pics of the pretty thing.  Anyway Pep had
some sofa pillows that needed recovering and
so the valance fitted right in with her color scheme.
Did I forget to mention that the Valance was lined!
And also that the pretty red buttons were attached.
That sure was a nice bonus!
Hardly any work here!
The same design is on both sides of each pillow.
Anyway my grandaughter Elise has been
spending a lot of time with me in my sewing
room and she helped me tremendously with the
making of these pillows. (I love teaching her).
 Can you see the lining?
I wanted a different kind of a pillow so at the top
all we did was attach cotton strips and tie them up.
Nothing frilly - no bows just knots.
Each pillow is encased in a zippered
cotton pillow cover that we cut down from
some extra bed pillow covers that I owned.
Thank you Elise for your help!
Thanks for visiting me.
Many hugs and kisses to you all,
Hopblogger


Monday, April 23, 2012

A Crochet Hook Organizer

Hello Everybody. I hope
that you all have been well.

I would like to welcome my
new followers. I hope that you
enjoy my blog.


I made a Crochet Hook Organizer
for my daughter Peps friends mother.
Linda makes baby blankets and donates them
to her church. They either sell them or give
them away to needy babies. I am not sure which.
Crochet Organizers can be elaborate or simple.
I choose to make it simple and fast. I could
not cut off the threads because I was concerned
about cutting the material so Linda will have
to cut them off herself.
I also decided to make
the little organizer out of recycled clothes.
The light yellow color is made from a baby
blanket and the outside is from an
embroidered shirt. The inside floral pattern
with the rickrack
is from a childs dress. I also bought some
new hooks in case she needs them.
Pep and I were playing Rummy. She was
beating me! Lol's
The front of the Organizer.
 The baqck of the Organizer.
 The inside of the Organizer with the flap
down to cover the hooks.
 There is a little pincushion that is just a piece
of simple material. Beneath the crochet hooks is a
wide section where Linda can store a pair of
scissors or anything else that she wants.
 The back of the organizer.
Thanks for visiting me!
Many hugs and kisses sent your way,
Hopblogger


Sunday, April 15, 2012

This years side Garden

I had to escape from all of this pollen. It just
about killed me. I am up now because today
I came back from the camper. All rested and
I enjoyed the haunts of the thrift stores while
I was there. Surely if I were here I would be
down in the bed. But low and behold my
eyes are burning even as I type this. So I
do not know if I will be going to bed or
not. That is the question! I dislike showing
you my trash cans but what else can I do.
Be sure to look at all of
that yellow green pollen that is
on the lid of the green trash can. The pollen
was horrible this year! It is all over my
front porch and chairs. At the beginning
of Spring it was all over the cars.
My hubby took these pics of my back
side yard. Did you
get the pollen bad this year?
Enjoy the pics!
 A better close-up of my Baby Banks. It is huge and
I just love looking at it through my windows.  I love
how it grows wild and covers my hydrangea bushes.
Just double click and look at the pollen on the trash
can. My hubby cleaned off the blue one because
she was just emptied.
 Do you see some of the purple Wisteria starting
to bloom. The purple and yellow are so pretty
when they bloom almost together. There is always
something blooming in my yard. It is a joy to
watch it from the windows in the Spring.
 The Wisteria is growing in another spot along the
fence as well. I hope in a few years that this area is
full of purple, yellow and blue among the other colors
of the lillies. And just maybe all of that will help
with the growing of that scrawny rose bush that
is located in the corner. I have not
had much luck growing that one.
 I do not know the name of this plant. It was planted
last year in the summer.But it is growing good. My
lillies are getting bigger. Lillies love my yard. I do
not know how it happens but my lilly's grow bigger
and bigger every year! They must love the soil.
Have a great day and thank you for visiting me!
Hopblogger


Sunday, April 8, 2012

My New Quilting Box

FIRST - I WOULD LIKE TO WELCOME
ALL OF MY NEW FOLLOWERS TO
MY BLOG. I HOPE THAT IT INSPIRES
YOU IN ALL OF YOUR CREATIVITY!

A couple of weeks ago I made over a
baby box. I could have decorated the box
with sewing supplies.
However I wanted something different.
My butterflies came
from the scrapbooking supplies at
the craft store. They were a thick
cardboard. And they stuck to the box
really well.
I also desired that the box be simple.
The box was just the right sizse to hold all of
my quilting supplies.
As you can see the first drawer holds my
rotary cutters with their blades.
 The second drawer holds needles, thimbles along
with other small stuff. I found out in Germany in the 1980's
that the best thimble was one with a magnet
on top. I want to buy a couple more of these
thimbles in case I loose this one. Have you
tried one of these type of thimbles? If you get
one of these - you will love it.
I was thinking about
placing cork on the inside of the box lid so I could
pin up some pics. As of yet I am not quilting
any quilts so that will be something that I
do later.
 The bottom drawer holds my large safety pins.
I put these safety pins in zip lock bags. Believe
me I have plenty more safety pins that are
currently being used. I am so glad that this
drawer will hold 3 or 4 more bags of safety pins.
The little black tin box holds my quilt pins. The
little brown egg that you see is a scented acorn.
It smells like vanilla.
I am so glad that this box holds everything. Maybe
you could use a box like this to hold your
cross stitch supplies. Ummm I think I need
another baby box!
Thank you for visiting my blog.
Take care & visit me again!
Many hugs and kisses to you all.
Hopblogger


Monday, April 2, 2012

LIEBSTER AWARD


I was very surprised when
Faith of 'Faithfully Stitching' told me
that she gave me the Liebster Award.
She was so kind.
Thank you very much Faith. Her link is here:

This award
is given to a blogger with less than 200 followers.
It is a german word that holds many
meanings such as favorite,
dearest or beloved.
There are 5 rules
1. Post the Award on your blog.
2. Link back to the blog that gave you
the award.
3. Reveal 5 things that no one knows about you.
4. Give the award to 5 other bloggers.
5. Leave them a comment telling them you
gave them the award.
The 5 things that noone knows about me are:
1. I am a celiac. I am highly allergic to wheat, corn.
along with trees and Kentucky Blue Grass which
is located all over North Carolina. This puts me down
in the bed for 2 seasons out of the year. Shots and
pills are useless to me. My name should be
Mrs. Rip Van Winkle!
2. This year I have been married for 38 years to the
same wonderful man whom I love dearly. In fact I
have lived longer with him than I ever lived with
my parents.
3. I was married, graduated from high school and
had my first child all in the same year.
4. My sewing room is totally, utterly, terribly, horribly disorganized.
I can never keep it clean or straight for long. And
if I put things away most likely it will be another
year when I clean - before I can find it again.
5. I was born around Atlantic Beach and I have
never been able to swim.

Now it is time to tell you the following blogs
whom I will give the Liebster Award to. I am
sure that you will like them all as well as I do.
1. Marlene of Poppy Patchwork.
2. Trixie of Fair city of Portland Oregon. I
find her blog amusing.
5. Lastly Kat of Flopsy Kitten Stitchin. Her blog is
Now I am almost finished. All that is left is to leave
them a nice comment telling them that I have
nominated them for the Liebster Award.
Many stitching hugs and kisses to you all,
Hopblogger

Sunday, April 1, 2012

WELCOME

I would like to take a moment to welcome all of my
new followers. However some of your blogs
are not being shown. Send me an email
and let me know where I can find you!

Many stitching hugs and kisses to you all,
Hopblogger

Monday, March 26, 2012

RENEW and REFRESH an old Baby Box

Have you still got your child's old
baby box. Are you hesitant about throwing
it away. Well dont do that. Refresh that old box
and use it for something else.
This is actually a very nice box that I picked up
at the thrift store. Yes it was a little dirty
but all n all - it was not bad. The box was
sturdy with no tears on it. I love boxes!
 You can see the dirtiness of the tabs that open the
box as well as some of the dirt on the inside.
Something red was in one of sides. You can still
see it.
 The bow was dirty but that is easy to replace.
Read those sweet words that surround the photo
of Pooh bear. We have to hide those words.
 Pretty butterflies are all over the box including
the bottom.
 Well here goes - this is what I did. I cleaned up
all of the inside slots in both drawers. Here you
see me cleaning up the red spot. I do not know
what was in this drawer but it cleaned up okay.
 Time to change that ribbon. I used the same kind of
white ribbon that was on the box. So glad that I had
some of it already left over from prior projects.
The old ribbon pulled out and with a safety pin I
pulled the new ribbon thru and tied it in a bow.
 I used a flowered scrapbooking paper that had
many of the colors of the butterflies that were on
the outside of the box. Flowers and Butterflies
coordinate.
 After I finished the bow then I cut out a
pattern for the scrapbook paper. All I did was take
a piece of computer paper and lay it on top. Then
with my fingernail I pushed the paper all around the
edges creating a pattern. I removed the paper and
cut out paper pattern. Then I traced around it on
the scrapbooking paper. The flower design is not
even glued in - I just placed it in the indented area.
This spot is also great to put a loved ones photo.
This would personalize the box and look great!
But I did not have that kind of a use for this box.
 The inside looks good with scrapbook paper. I
did not glue it down either in case later I want to
change it. The flowers look great with the blue green
checks.
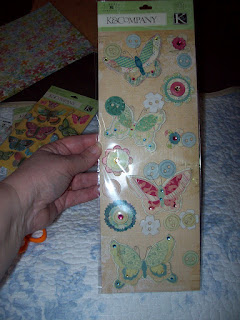
 The scrapbook paper I already had, but I had to
buy the butterflies at the craft store. I looked
for flowers but I could not find anything that I
liked. These are butterfly stickers. They are
made from cardboard.
 I positioned the 2 large butterflies to hide the
words Baby. Then I used 2 smaller flowers to
also hide the words baby. The cardboard stickers
also had button pieces. So I placed 2 of those
button stickers on top. They adhered very well.
 This is what onse side of the box looks like.
 This is the other side of the box.
 I removed those old pull tabs that opened the drawers.
See how grimy they are. They got thrown away.
 This is how I replaced them. I used white ribbon
and threaded it thru one of the cardboard stickers.
The older tabs when removed left holes. So I threaded
the ribbon thru those holes to the inside of the
drawer.
 Here you can see where I knotted it really good.
Afterwards I trimmed up the ribbon.
 Now the box looks really good. Time to see what
I want to stuff in it.
I hope you enjoyed looking at my new box.
Next week I will show you what I used it for.
Thanks for visiting me!
Many hugs and kisses to you all.
Hopblogger