Have you still got your child's old
baby box. Are you hesitant about throwing
it away. Well dont do that. Refresh that old box
and use it for something else.
This is actually a very nice box that I picked up
at the thrift store. Yes it was a little dirty
but all n all - it was not bad. The box was
sturdy with no tears on it. I love boxes!
You can see the dirtiness of the tabs that open the
box as well as some of the dirt on the inside.
Something red was in one of sides. You can still
see it.
The bow was dirty but that is easy to replace.
Read those sweet words that surround the photo
of Pooh bear. We have to hide those words.
Pretty butterflies are all over the box including
the bottom.
Well here goes - this is what I did. I cleaned up
all of the inside slots in both drawers. Here you
see me cleaning up the red spot. I do not know
what was in this drawer but it cleaned up okay.
Time to change that ribbon. I used the same kind of
white ribbon that was on the box. So glad that I had
some of it already left over from prior projects.
The old ribbon pulled out and with a safety pin I
pulled the new ribbon thru and tied it in a bow.
I used a flowered scrapbooking paper that had
many of the colors of the butterflies that were on
the outside of the box. Flowers and Butterflies
coordinate.
After I finished the bow then I cut out a
pattern for the scrapbook paper. All I did was take
a piece of computer paper and lay it on top. Then
with my fingernail I pushed the paper all around the
edges creating a pattern. I removed the paper and
cut out paper pattern. Then I traced around it on
the scrapbooking paper. The flower design is not
even glued in - I just placed it in the indented area.
This spot is also great to put a loved ones photo.
This would personalize the box and look great!
But I did not have that kind of a use for this box.
The inside looks good with scrapbook paper. I
did not glue it down either in case later I want to
change it. The flowers look great with the blue green
checks.
The scrapbook paper I already had, but I had to
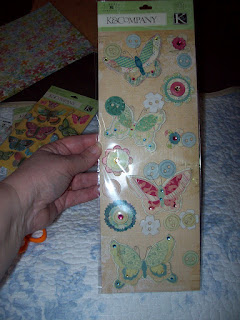
buy the butterflies at the craft store. I looked
for flowers but I could not find anything that I
liked. These are butterfly stickers. They are
made from cardboard.
I positioned the 2 large butterflies to hide the
words Baby. Then I used 2 smaller flowers to
also hide the words baby. The cardboard stickers
also had button pieces. So I placed 2 of those
button stickers on top. They adhered very well.
This is what onse side of the box looks like.
This is the other side of the box.
I removed those old pull tabs that opened the drawers.
See how grimy they are. They got thrown away.
This is how I replaced them. I used white ribbon
and threaded it thru one of the cardboard stickers.
The older tabs when removed left holes. So I threaded
the ribbon thru those holes to the inside of the
drawer.
Here you can see where I knotted it really good.
Afterwards I trimmed up the ribbon.
Now the box looks really good. Time to see what
I want to stuff in it.
I hope you enjoyed looking at my new box.
Next week I will show you what I used it for.
Thanks for visiting me!
Many hugs and kisses to you all.
Hopblogger


5 comments:
Conny: What a great find and the finishing is georgous.
Catherine
I love the finish you have done to this box, so very different now.
I just gave you an Liebster Blog Award.
Read about it on my blog
http://faithnchls.blogspot.com/search/label/Liebster
What a lovely box your created! I love the colours and idea is fantastic!
Hugs,
Tatyana
Conny: I am on the road today and will email you tomorrow or late this evening, I have lots to tell you.
Catherine
P.S.
Are you still looking for the Sewing Room kit By Leisure Arts?
Post a Comment