
Hello Everyone!
Am sorry that it has been a while since I last
posted. All of the Holidays caught up with
me!
So I hope that you like what I have been
working on. If you know someone who
uses powder and needs a powder puff,
then this easy Powder Puff is for you.
It is easy to make. The materials used are
not costly. It is up to you if you buy
your materials which adds to the cost of
making anything or you use what you
have which reduces the cost considerably!!
I am going to show you 2 styles of
the powder puff - BOTH ARE MADE THE
SAME WAY!
SAME WAY!
Please read all directions carefully and
make sure you understand them before
making the puff.
If you like what you see, please link back!!!
You pick the style of the puff that you like -
directions are easy! The only difference is the
top!
SUPPLIES NEEDED:
1. Make-up sponges.
2. lace or thin sweater fabric 3inches X 12 inches.
3. Needle and thread.
4. Cotton quilt batting.
5. A small amount of pretty trim.
6. A Corsage Pin.

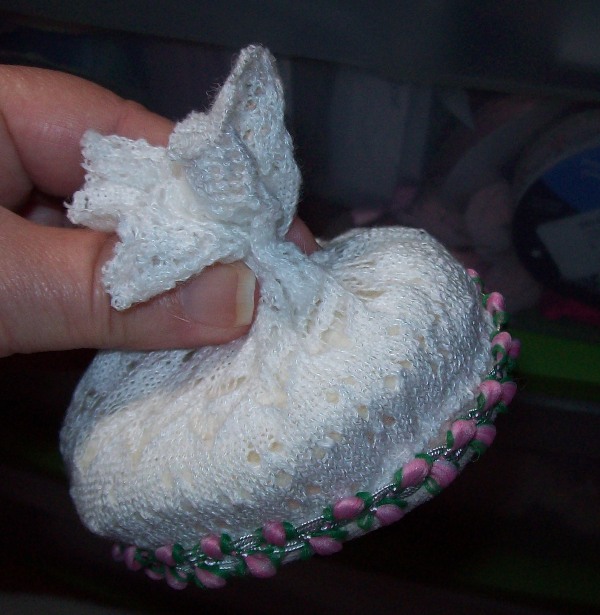
STYLE 1 - This is Lynda's Powder Puff - top view! Isn't it
pretty!

Here is the side view of her powder puff.

STYLE 2 - This is my daughter Pep's powder puff.
Top view - this is very pretty also!!

This is the side view of her puff. Same as Lynda's!

This is the bottom of both styles of the
Powder Puff.

I went looking at stores for these makeup
sponges, I guess that is what they are called.
I bought mine on ebay from china cause these
were the right size that I liked and from looking
at them - they looked soft and thicker than the
ones I had seen. Plus they were bigger.
You buy yours any size you want in the stores
of your choice.
You will find that these sponge fabric makeup
sponges are cheap!

These sponges have a sweet old-fashioned look
to them and they are super soft!

This is the back of the package.

The size of the sponges are about 3 inches in
diameter. You can make these puffs smaller
or bigger - it is just according on what sponges
you find.

But, try to find sponges that are as thick as you
can. The sponges are thin, but some are a little
thicker than others.
See the silk ribbon where you put your fingers
through. Make sure your sponges have this
feature.

The first thing to do when making these powder
puffs is to cut just one of the silk ribbons away
from the sponge. Cut as close to the seam as
you can without cutting the sponge fabric.
Like I have done here.

See, it is loose now. Do not cut the other
side.

Turn under a small hem.

And pin it down onto the sponge.

See, this is what it looks like from the inside
as it is pinned with only one pin.

I always use small Quilting needles along with
quilting thread. As this thread is stronger than
regular thread.
Nothing is more annoying than your thread
breaking while you are stitching - so use
good quilting thread!

Here you see that I have sewn it down already.

Use wide lace or you can do what I did!
This lace is not lace at all!! It is part of a piece
of a nice old sweater. That is right - a sweater!
I like the holiness of the sweater plus this is
a fine sweater - not bulky at all.
Since this sweater is thin, I will need to cut 12 inches
of it in length. I used the bottom of the sweater.

I cut the sweater 3 inches wide.

I do realize that it is hard to tell what I have done
here, but I folded the length in half. The raw
edges are at the left. The right side is the folded
side. The top and bottom of this piece are the
raw edges. See the bottom at how the edge
rolls up. That is why I cut the sweater up - I got
tired of my sweaters hem rolling up!
The sweater was free. It was mine and it was
clean and had no defects.

Okay, so I picked up the piece and stitched
the 2 sides together into a tube.

Can you see that it is just one piece now with
a seam.

I started at the bottom rolled edge. Start at the
seam. And just sew all around the tube so you
can gather it up.

Here it is being gathered.

Gather it nicely and pin it to the sponge. Be sure
to put your lace or sweater fabric on the side of
where you sewed down the ribbon cause we want
to hide the ribbon seam.

Keep in mind that as you are looking at my
photo you can see the rolled hem of my
sweater. I will try to stitch the sweater to the
seam of the sponge. This is your guide.

I stitch with one strand of the thread. Hide your
knot and begin sewing as close to the ribbon as
possible. Be sure to keep the sweater or lace as
close to the seam as you sew. Do not make your
stitches too small or to big.

Also hold the lace or sweater with your thumb
like I am doing in this photo. This is just to
get started.

As you can see here in this photo. I have opened
up the sweater tube so I can get my fingers on
the inside to help hold the fabric down with
my thumb. I am almost finished sewing.

This is what it should look like when you
are finished.

Now you should stitch a trim there to hide the
stitching and also to finish it off nicely.
You can pin it down or hold it down and sew as you go.
You are the stitcher so do whatever is comfortable
to you.

I have sewed on the trim and hid the seams
or any frayed edges. You do the same.

Now, scrunch up the top as you see here and you
will see and feel that it is a little too thin.

I took a sponge and cotton quilt batting.
I cut 4 pieces of the batting the size of
the sponge. Just lay the sponge on top
of some folded batting and cut the batting,
but make sure not to cut the sponge!

Now open it back up and put the 4 layers of
cotton batting inside.
Scrunch up the top again and make sure that it
feels good to your fingers. If it looks to thin,
then just add another layer or 2 of cotton batting.

Get someone to hold the top closed as tight as possible.
Take some quilting thread and tie around the top
like you see here. Keep going round and round
the top until you are near the end of your thread.
Be sure to knot off the thread and then cut away
any excess.

Here the knotting is finished.

This is what the top looks like for both styles - when
you fluff out the top.
I call this tuft of fabric a flower!

FOR STYLE 1 - Push the flower down. Then
pin on the corsage pin. The flower can be seen around
the corsage pin.

FOR STYLE 2 - You must cut off some of the
flower so that when you pin on the turtle
corsage pin, the flower is hidden beneath
the corsage pin.

This is the side that you pat into the powder!
I hope you liked this easy Powder Puff!!
Say you saw it here and always link back!!
Please give me credit for tutorials that
I give to you!
Thank you for visiting me.
Come again!
Hopblogger
4 comments:
Beautiful, and you make it look so easy!!
Conny: Wow what a great tutorial, love the puffs, so sweet.
Thank-you for sharing with us.
Blessings
Catherine
Thank you for the tutorial. The puffs are lovely!
Hugs,
Drora
it is used for me to be here Embroidery Digitizing Services for all of one to be used *(^*&^%^$%^$#657689
Post a Comment