Wednesday, March 26, 2014

PILLOW SHAM SEWING MACHINE AND SERGER MACHINE COVER

Hello Everyone!
 
These sewing machine and serger machine covers
are super easy!!
 
I made a set for Catherine and forgot to show you
what they look like. Catherine's covers were
Shabby Chic. These that I made for my sewing machine
and serger are a country patchwork.
 
These are SUPER SIMPLE! One pillow sham gives
you a front and a back. I can use either side that I want
for the front side. I sewed lace on the bottom of both
edges. I had a pink silk bow with a matching silk
flower that was in my craft box. I had taken these
from a dress that I cut apart many, many years ago.
The pink silk bow  is safety pinned on.
 
The other side of the pillow sham has the pink silk
flower on it. I did not sew this one either - just pinned
it on there with a large safety pin.
 
I have had these ties for eons. They came from
shopping store bags. I am glad that I was able
to use these here.
 
I wonder though if I should have kept
the blue strings together and the white
strings together. Nah - I think that I like
this look.
See how fast this cover was to make!!
 
This is the serger machine cover. It is also
reversible. I am not sure if I like this look or not.
I will have to think about it. Perhaps I open up the
sides and add more ties on the sides. I am looking
for a flower or something to dress it up some.
 
Pick you out some pretty shams that you are not using.
I have had these for years.
 
Turn the pillow sham to the inside and either
machine sew or hand sew it closed.
 
This is what mine looks like. Now you are finished
here. Just add your ties and decorate the front and
back!
I hope you enjoy doing this project!
Thank you for visiting me
Hopblogger


Wednesday, March 19, 2014

Cutlery Boxes made into Sewing Boxes or whatever!

Hello Everyone!
 
Today I am talking about Cutlery Boxes.
We have all seen them, used them and
then disposed of them when we finish of them.
Because basically
our styles change or we just tire of
them. Or maybe they broke.
 
Well, these are nice sized boxes. I took
the pictures of these wooden boxes
back in 2009 with the intention of making
something out of them back then. I completely forgot
about these boxes until about a month
ago when I found them again. Anything
can get lost at my house.
 
You can make these boxes into anything
you desire. I happen to love sewing boxes,
thread boxes, any kind of a box really.
These boxes can be purchased at thrift
stores or perhaps you already have
1 or 2 of them hanging around in your
attic. Oh, another thing - some of
these boxes have a cardboard bottom.
That is okay, some boxes are all
cardboard.
Should you get one of these boxes
just be careful when you paint or
strip stain from the bottom of the box
because
of the cardboard. Some of these cutlery boxes
are stained in nice colors.
I have 3 of these cutlery boxes and 2 of
them have cardboard bottoms.
No biggy!
 
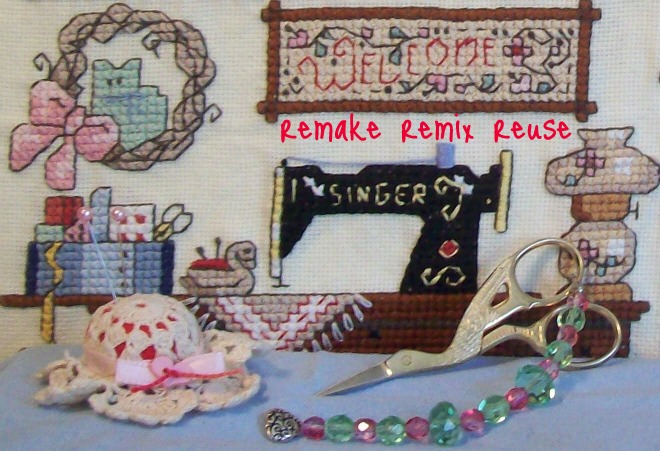
The pictures you see is one of these
cutlery boxes made into a sewing
box. I made this Shabby Chic box for my
friend Catherine. I made it so she
could put it beside her sewing machine and her
Serger machine to hold scissors, threads, pincushions.
These things would be within arms reach and hopefully
would look nice on her table. But really, Catherine, you
can use this box for whatever your heart desires.
You should be
receiving it soon. This is part of her surprise.
I did put other things in the box for her, that I
am not showing, hope she likes it all!
 
So - now start looking at those
cutlery boxes!!!
 
 These cutlery boxes are about 14 to 15 inches wide,
10.5 inches long and 3 inches deep. Both are different
colors. The top one is a reddish color while the bottom
one is an old brown color. My 3rd box not pictured here
is a pretty brown. All of these boxes will be painted or
papered inside and out.
 
Look inside of these boxes and strip out all of the
dividers and or felt that you see. Clean her up!
 
I have painted this one white with ordinary craft
paint.
 
Here is the front of Catherine's box. I used empty
thread spools for the feet. I wrapped white lace
around each spool and topped it off with some sheer
pink ribbon. The box is papered with
shabby chic scrapbook paper that I downloaded
from the internet.  This paper is so pretty! It is one
of my favorites.  The good thing about having
feet on this box is that it gives her a place to store
some cross stitch leaflets for future projects. Or she
can store her sewing machine books there.  I glued
a cute pink sheer ribbon with a ribbon rose in the
indention of the box on the front.
 
To decorate the top of the box -
First, I glued down
another shabby chic paper and trimmed it with lace.
I put 4 pink sheer bows at each corner.
Second, I dyed some cheesecloth with
Kool-aid in pink and blue, mixed in some
white cheesecloth and glued it to the top of the box. 
Third, I used 2 cream colored cherubs that hang
on the wall! Included with them was the pretty
flowers that you see here. They are so
sweet but a little heavy. They are glued down good, but
still be careful when opening the box.
Fourth, after letting the cherubs dry and that took
about 4 days to do so. I then added some craft pearls and
bunched up the cheesecloth around the cute cherubs.
I also added little pieces of cheesecloth here and
there between the flowers.
The pink sheer bow you see has a white button in the
middle of it. 
I cannot even begin to tell you how
pretty the top of the box is. It turned out lovely. I am
pleased with the overall look of it.
 
Here is the left side of the box.
 
I thought that this was the right side - but it is not.
I must have thought that I was looking at the right
side. Sorry.
 
Here is the back of the box where the hinges are.
 
This is what the inside of the box looks like. Catherine
loves pink, white and red. I did not use anything that
was red. I used a pink flannel to
line the box and then put lace around the sides
on the top of the lid and the sides of the bottom half
of the box. All of the lace inside and outside of the
box are the same lace.
 
I glued on white pockets from Aida cloth and
glued on sheer pink bows. These pockets are a
little tight. I forgot to give each one a little slack,
so please be careful if you put something in them.
In one of the pockets I gave her a cherub magnetic
needle holder for her cross stitch.
 
We cut some pretty bright white string. My hubby
screwed each string into the box on each side
so the lid could stay up and the box not topple
over because of the weight of the cherubs.
I gave her some surprises on the inside of
the box which I hope she likes!
Have a lot of fun!!
Thank you for visiting me.
Conny


Sunday, March 9, 2014

A Sewing Machine cover made from Pillow Shams!

A GIFT FOR MY FRIEND!
 
I made my friend Catherine
over at "I Love To Stitch", a
sewing machine with a
matching serger cover!
 
I really do like how it has turned
out and I hope that she does also.
 
Let me tell you how this is made.
 
This is EASY PEASY!!!
AND IT IS MADE IN MINUTES!!
 
MATERIALS NEEDED:
2 Shabby Chic full size Pillow Shams, a little
bit of lace, ribbon ties, 3 buttons and
a little bit of flannel for the letters!
Further down I tell you how to make it.
 
This is what the first pillow sham looks like as
a finished Sewing Machine cover, without the pink letters
that say the name of her blog. you can see the pink
letters on the 3rd photo. This sham was not
cut in any way. The sides were not sewed together.
They remain open with just pretty sheer pink
ribbons to tie it on. Neither did I hem any of the
lace on the sides. Again hope for it to look shabby.
 
 I did not cut any of the second pillow sham. The Serger Cover is
stitched up on both sides. I was not sure of the height
of her Serger so I am including some of the lace so
she can stitch it to the bottom, just in case it is
a little short. I think that the width of this cover is
okay and should fit her Serger.
 
I hope Catherine likes this. I tried to make it
Shabby. I just drew out the letters on paper and cut
them out. Then I traced them onto fabric and pinned
the letters where I wanted them. I want the letters
to eventually fray to make it more shabby.
 
Here is a picture of what the pillow shams look like.
Hold the pillow sham up against your machine and
see which side looks best against it. If you need more
width then just turn the sham lengthwise. Otherwise
just fold the sham in half and there you have a
front and a back. Choose which side you like
best to be the front side.
 
Turn over the pillow sham and give some small
stitches to stitch down the inside opening. I hand stitched
this closed because I did not want any machine
stitching to show on the front side of the sham. I
like how this gives an automatic lining to the covers.
I hope that you are able to see it.
 
I hand stitched the lace to the backside. Add lace
or ruffles to give the sham height.
I have not shown you where to stitch on the ties.
That is left to your discretion. I placed my ties
about halfway down and hand stitched them on.
Adding multiple ties on each side, would be so cute.
After the ties are on - then decorate the top
of the shams if you wish.
I forgot to take a photo of how the shams look
on a sewing machine and a serger. Perhaps
Catherine will show you. However I did
place the sham on top of my machine to
make sure it would hopefully fit her machine.
 
I have a couple more full size pillow shams. Next week, I will
make them up and show you what those look like
on my machine and serger.
 
Catherine - I hope to get these in the mail to
you later this week. There is an additional
surprise coming with these covers!
 
I sure do hope that you will use this idea!
Thank you for visiting me.
Many smiles, Conny