Saturday, September 24, 2011

Help I lost my broom!

This poor little witch was just flying
around and ran into the moon!
Her broom fell to the ground.
Gee - I hope someone will help her!
They are all titled 'Help I lost my broom'.
Three patterns I have made for you -
yet each one has only a slight difference.
This first pattern has a normal spider.
When the witch plowed into the moon
the poor little spiders legs drooped.
 This 3rd pattern has a much smaller spider.
As you can see I couldnt make up my mind which
spider I liked best so I decided to post all 3 of them.
happy halloweeeeeennnnnn
by Hopblogger

Monday, September 19, 2011

Here I am

I have been so excited!! My dollhouse
was published in the October issue
of this magazine!!
I wanted to tell you but I couldnt!.
I hope that you will see my dollhouse!
This is my daughters copy - mine hasnt
came in yet. I cant wait to have my copy!
Many hugs
conny


Saturday, September 17, 2011

A small halloween biscornu or scissor fobs

I am still unable to cross stitch.  So I
have not tested these patterns.
Here are 3
halloween patterns that are meant to be
used as a small biscornu or scissor fobs.
Use any 2 of them together to make a front
and a back.
Ghost Boo is either stitched on 14ct black aida or
linen - or you can use 14ct white aida and stitch
with black 310 DMC floss. I drew in a ghost
figure however I will be substituting it for a ghost button .
If you decide to use a button instead of this ghost
then be sure to mark the center of the aida fabric
with an x so you know where to put the button.
The same goes for the pumpkin and the spider patterns.
 I will also be substituting the pumpkin for a
pumpkin button
 the Spider will also be sutstituted with a button
but the spider web will remain.
These patterns are 30x30.
As you can see they are
not all that big.
Also I want to say that I have never included
directions on this blog on how to make a biscornu.
The reason is because there are so many
directions out there on the subject that I felt that
there was not any reason to duplicate any of it.
On my biscornu patterns the outer stitch that you
see is the stitch that connects front and back together.
That stitch is a running stitch - not a cross stitch.
I hope you enjoy these patterns.

Tuesday, September 13, 2011

Free Halloween Patterns

Hello Everyone!
Here are 2 small patterns for you.
The first titled  'Halloween' is the name
 for the shadowbox.  Its up to you on
how you decide to use them in your shadowbox.
The pumpkin is meant to stand in for the O.
My intention is to stitch up the word Halloween
into one long word and make it into a rectangle
pincushion. My plans are for it to sit on top of the box.
Unfortunately I am unable to stitch it up to show you
how it will look. I hope you like it.


This next pattern is also a simple one. 'Cobweb' is
writing to 'Are u wicked'.  This would look stunning
in cream and black.

Feel free to change the colors.
This would also be a great project for those that
do not cross stitch. You could easily do patchwork
in each of the squares - or embroider.  It is limitless
what you can do with these shadowboxes.
Maybe I will do one for Christmas also!
Have fun and get it done!
Hopblogger

Saturday, September 10, 2011

Halloween Advent Calendar

When I raised my daughters - Halloween was just
halloween to me. Every year I bought them candy and my
hubby gave out candy. 
For many years I walked around the
neighborhoods with them so they could trick or treat.
It gave me pleasure to see the happiness that were in their
little faces.
It doesnt seem that long ago that again I walked the
neighborhood trick or treating.  This time it was
with my grandchildren and my daughters.
Now my grandchildren only have about a couple of
years left and then they will no longer
trick or treat anymore. My - how time flies.
This year I have really gotten
into the Halloween spirit. Back in June I bought this
unfinished shadowbox. I knew what I was going
to do with it. Just didnt know how I was going to
do it. I had seen these shadowboxes made into
cross stitched shadowboxes. They were so cute.
I still might make one of those but not just yet.
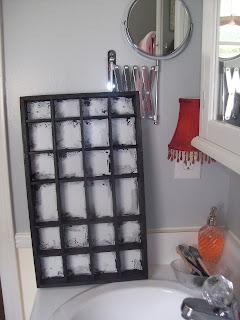
This box is going to be my Halloween Advent Calendar.
First, I painted it black. Look at the awful paint mess.
Dont worry about that because the
mess will be hidden with cross-stitched
halloween moifs.
 My problem came after the paint dried.
How was I going to do this?
Finally after much debate in my
head I decided that I would have my calendar
standing straight up like this instead of turned
the other way as is in the above photo.
This way it would allow for me to
have 4 patterns that were taller than the other
squares in the box. I want to put cross-sitched
witches in these tall squares and other designs
in the other squares.
Also I debated about how I want to store the
candy for the month. Do I want little
handmade boxes or little linen bags?
As of yet I dont know.
I do know that if I use little boxes then I
can put 2 or more of them in each square.
The little boxes would be good if you
have 2 children because you could
cross stitch a number and their names on
each little box. This way including the
very top of the box you could then get
28 days.
However since my children
are grown then I do not have to think
about this matter.
If you have kids
your soluion would be to get a bigger
shadowbox to accomodate your
30 halloween days.
Soon I will start posting the patterns
that I have designed for my
halloween advent calendar shadowbox.
You are free to use my tiny patterns or
someone else's.
Adjust the patterns to fit your shadowbox.
Once halloween is gone put the cross-stitch
items away and display pincushions
on it until next halloween.
Have fun and get it done!
conny

Thursday, September 8, 2011

Blogger updated

Hello Everyone!
I just wanted to give some more
information for those of you that
'your blogger updated your blog'.
Awhile ago I posted directions for
adding links. The information that I gave
only applies to the blog that is not updated.
I noticed that if you want to add new links
or to add your new blogs so people can see
it - then these directions apply.
Rosamargarita kindly translated those directions.

HOW TO ADD BLOGS OR LINKS TO YOUR
NEW UPDATED BLOG
1. Sign in to your blog.
2. You are now at the dashboard.
3. Do you see your photo.
4. Beside your photo - click on 'edit profile'.
5. A new screen will emerge.
6. Scroll to the top of the page.
7. You will see the words 'show my blogs' in blue.
8. Click on the words underlined 'Select blogs to display'.
9. A list will appear of your blogs. Make sure they are
check marked.
10. If your blogs are not there - below on the right side
in blue words it says to 'add'.
11. Add if you need to.
12. Be sure to SAVE YOUR SETTINGS.
ALL DONE!

I hope that you found this helpful.
Many hugs and kisses,
conny

Tuesday, September 6, 2011

The Giveaway has ended

Hello Everyone!
I would like to thank you all for the nice
comments that you left me.  You all were
very sweet.  Also I would like to thank those
sweet ladies that sent me emails concerned
about my eyes enough to tell me their own stories.

Sorry that it took so long!

According to my doctor it is going to take
6 to 9 months for my blurriness to go away.
I have found that if I use this font then I can
see the words. Its still blurry but I can make out what
the words say.

I put all of the names in a plastic container.
It is easier to shake up that way.
 Shake, shake, shake!!
 And I pulled out a name.
 Becca is the winner!!
My email address is cwethington@nc.rr.com

CONGRATULATIONS BECCA!
YOU ARE THE WINNER!

Becca - if you will email me and give me your address
then I will mail it to you.

If Becca does not answer in one week - then I will pull
another name out of the plastic container.

Take care of your eyes!
hugs and kisses from conny

Thursday, September 1, 2011

Bees Patterns

I n a few days I will be seeing who won on the giveaway.
Just be patient with me - my eyes are blurry.
Here are the Bee Patterns.
I give to you first the back pattern.
This is the front pattern.
 For the sides of the bucket - I have numbered them.
This is Strip 1
 Strip 2
 Strip 3
 Strip 4 - just connect the pieces together if you are
making a long strip.
For the needlebook just stitch one or more of the bees. Use the
flowers and grass if you want to. Stitch this on to aida cloth
or linen or dont. The choice is yours on how you make it.
 I used a sunflower which was a coaster. You know
those things that you use under cups and glasses to protect
your furniture.
For the chatalaine take a strip of ribbon not to wide and
not to thin. I use about 30 inches in length. Stitch together
a little pincushion from felt and be sure to sew a ribbon in it.
Hem up one end of the ribbon but be sure to put the felt
pincushion ribbon inside before stitching it down. Go to the
other end of the chatalaine here you can either add one of those
key rings or use ribbon. This is to attach your scissors.
Fancy these up anyway that you like and be sure to add
charms on your chatalaines.
Have fun - conny